Getting Started With CTMS
Note:
The MediaCentral | Media Suite API (also referred to as Connectivity Toolkit Media Services or CTMS API) is a family of HAL/REST APIs that allow access to the functionality of CloudUX systems and modules in a common way. This usually includes the following steps:
- Authenticate
- Query the CTMS Registry over HTTP to obtain a core set of links
- Make REST calls to the URLs within these links. The results are HAL resources with further links to additional functionality.
Through this iterative approach, code can navigate the entire API. The only hardcoded links required are any for authentication and the resource root for the CTMS Registry.
Using the API needs to adhere to the following principles:
- Caching and reusing a link within an active session is considered a good practice.
- Hardcoding other links or calling services via other transports (for example via direct Avid Platform bus calls or using the ACS Monitor) is not supported. Any implementation behavior that appears to function today may cease to work in the future as resource roots and sub-resource paths may change without notice as part of normal feature release work.
This tutorial shows how to send and receive request via Postman.
Prerequisites
Postman App. You can download Postman using this link: Download Postman App.
Application ID and Application Secret. To get Application ID and Application Secret you need:
Authentication
Before calling CTMS methods client must authenticate against the platform. After successful login client gets an access_token that is used in later requests to REST API like check-in an AAF file or List folder.
The access token should be added to the header.
Step 1
Before getting access token we need to obtain the authentication entry point resource. This is available under https://CloudUX_Hostname/auth link.- Open Postman App and create new request with GET method on https://CloudUX_Hostname/auth URL:
- You'll get a response with
auth:identity-providersresource, you need for the next step.
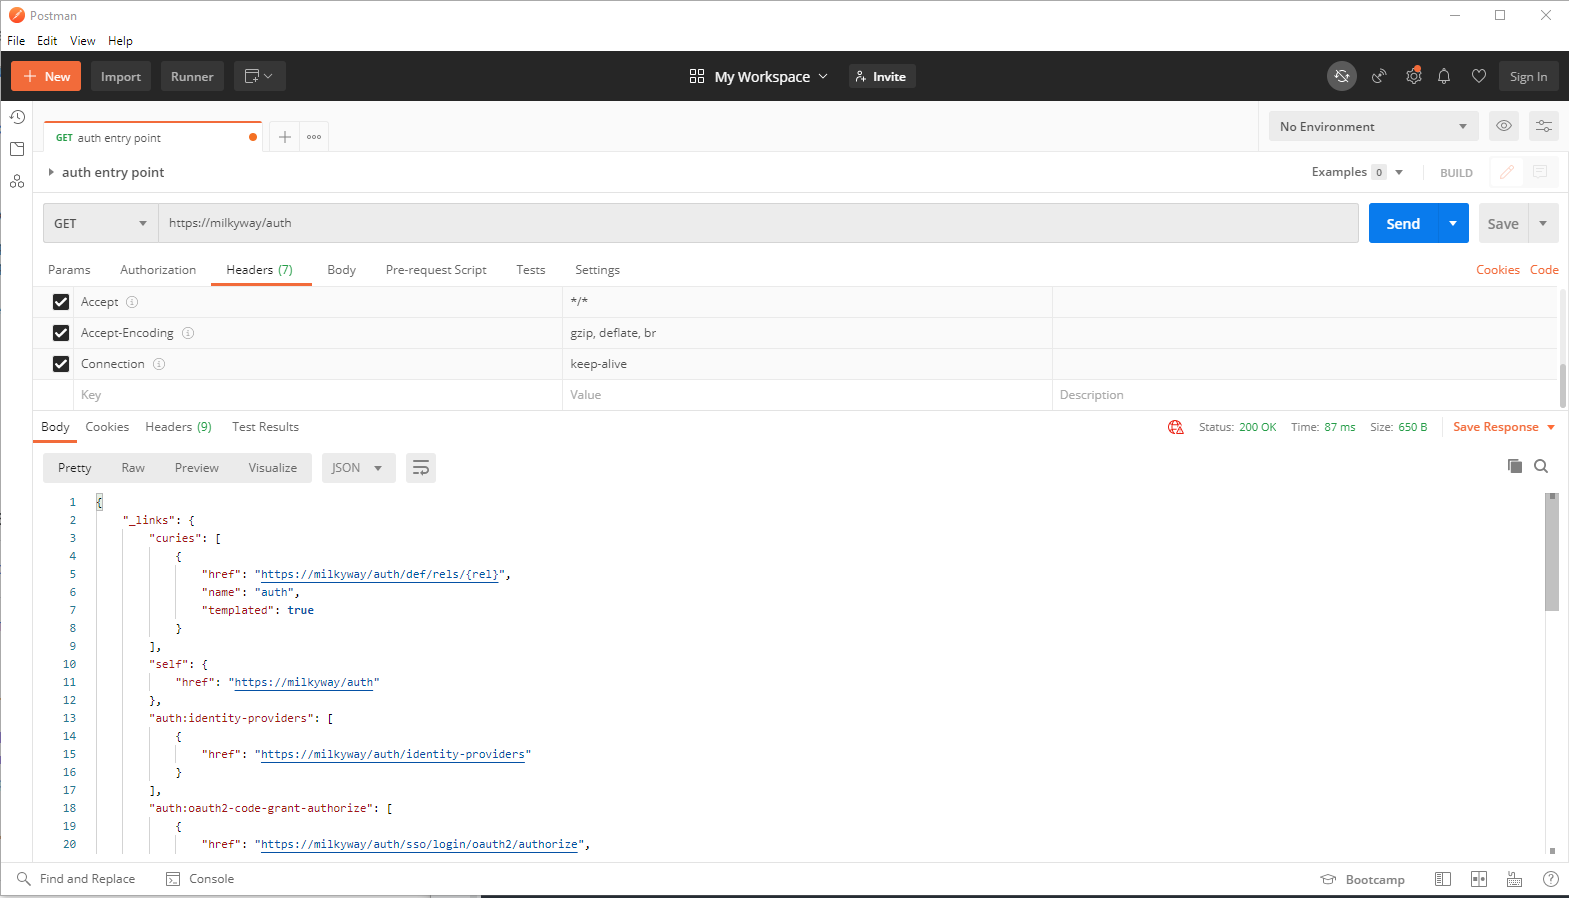
- An example response is showing below. Look for the highlighted text:
Authentication entry point
{
    "_links": {
        "curies": [
            {
                "href": "https://CloudUX_Hostname/auth/def/rels/{rel}",
                "name": "auth",
                "templated": true
            }
        ],
        "self": {
            "href": "https://CloudUX_Hostname/auth"
        },
        "auth:identity-providers": [
            {
                "href": "https://CloudUX_Hostname/auth/identity-providers"
            }
        ],
        "auth:oauth2-code-grant-authorize": [
            {
                "href": "https://CloudUX_Hostname/auth/sso/login/oauth2/authorize",
                "name": "code-grant-authorize"
            }
        ],
        "auth:oauth2-code-grant-login-and-consent": [
            {
                "href": "https://CloudUX_Hostname/auth/sso/login/oauth2/login-and-consent",
                "name": "code-grant-login-and-consent"
            }
        ],
        "auth:oauth2-code-grant-token": [
            {
                "href": "https://CloudUX_Hostname/auth/sso/login/oauth2",
                "name": "code-grant-token"
            }
        ],
        "auth:oauth2-token": [
            {
                "href": "https://CloudUX_Hostname/auth/oauth2/token",
                "name": "refresh"
            }
        ],
        "auth:oidc-token": [
            {
                "href": "https://CloudUX_Hostname/auth/id-token",
                "name": "renew"
            }
        ],
        "auth:sso-login": [
            {
                "href": "https://CloudUX_Hostname/auth/sso/login/saml2",
                "name": "SAML2"
            }
        ],
        "auth:token": [
            {
                "href": "https://CloudUX_Hostname/auth/tokens/current",
                "name": "current"
            }
        ]
    }
}
Step 2
Client must select an identity provider as an authority that handles the login / verifies user credentials.auth:identity-providers resource enables discovery of available identity providers which may be then found in the supplied URL.
-
To get a list of available identity providers click on link with
auth:identity-providersresource in the Postman response field.
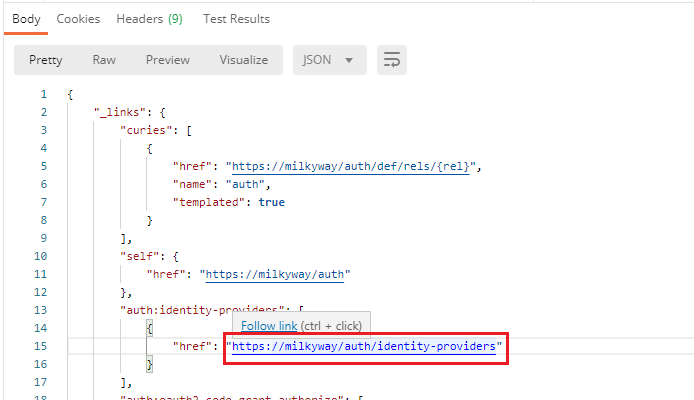
-
This will open another tab with
auth:identity-providersGET request: - You'll get a list of identity-providers from the request above. The link of identity provider you need is under
auth:ropc-defaultresource.

- An example response is showing below. Look for the highlighted text :
Authentication entry point
{
    "_links": {
        "curies": [
            {
                "href": "https://CloudUX_Hostname/auth/def/rels/{rel}",
                "name": "auth",
                "templated": true
            },
            {
                "href": "https://CloudUX_Hostname/auth/identity-providers/kind/oauth/def/rels/{rel}",
                "name": "auth-oauth",
                "templated": true
            }
        ],
        "self": {
            "href": "https://CloudUX_Hostname/auth/identity-providers"
        }
    },
    "_embedded": {
        "auth:identity-provider": [
            {
                "_links": {
                    "auth-oauth:ropc-ad": [
                        {
                            "href": "https://CloudUX_Hostname/auth/sso/login/oauth2/ad"
                        }
                    ]
                },
                "kind": "oauth"
            },
            {
                "_links": {
                    "auth:oauth-ad": [
                        {
                            "href": "https://CloudUX_Hostname/auth/sso/login/oauth2/ad"
                        }
                    ]
                },
                "kind": "oauth"
            },
            {
                "_links": {

                    "auth:ropc-default": [
                        {
                            "href": "https://CloudUX_Hostname/auth/sso/login/oauth2/ad"
                        }
                    ]

                },
                "kind": "oauth"
            },
            {
                "_links": {
                    "auth:oauth-default": [
                        {
                            "href": "https://CloudUX_Hostname/auth/sso/login/oauth2/ad"
                        }
                    ]
                },
                "kind": "oauth"
            }
        ]
    }
}
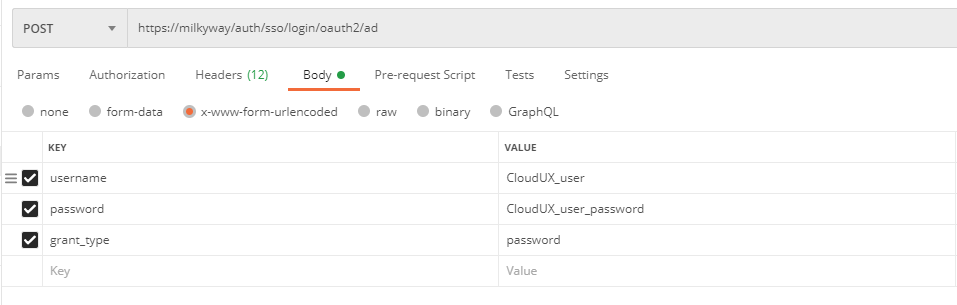
Step 3
Now making request to auth:ropc-default resource you can obtain the access_token.
-
Click on link with identity-provider
auth:ropc-defaultresource in the Postman response field. You will see a new tab with the request. - Change request method to POST.
- Choose 'Headers' tab and add two headers:
Content-Typeheader and set toapplication/x-www-form-urlencodedAuthorizationheader MUST contain Base64 encoded payload < Application ID:Application Secret >

-
Inside 'Body' tab choose
x-www-form-urlencoded. Body MUST contain the following fields:- username = CloudUX_username
- password = CloudUX_user_password
- grant_type = password
- After clicking on "Send" button you'll get your access_token:
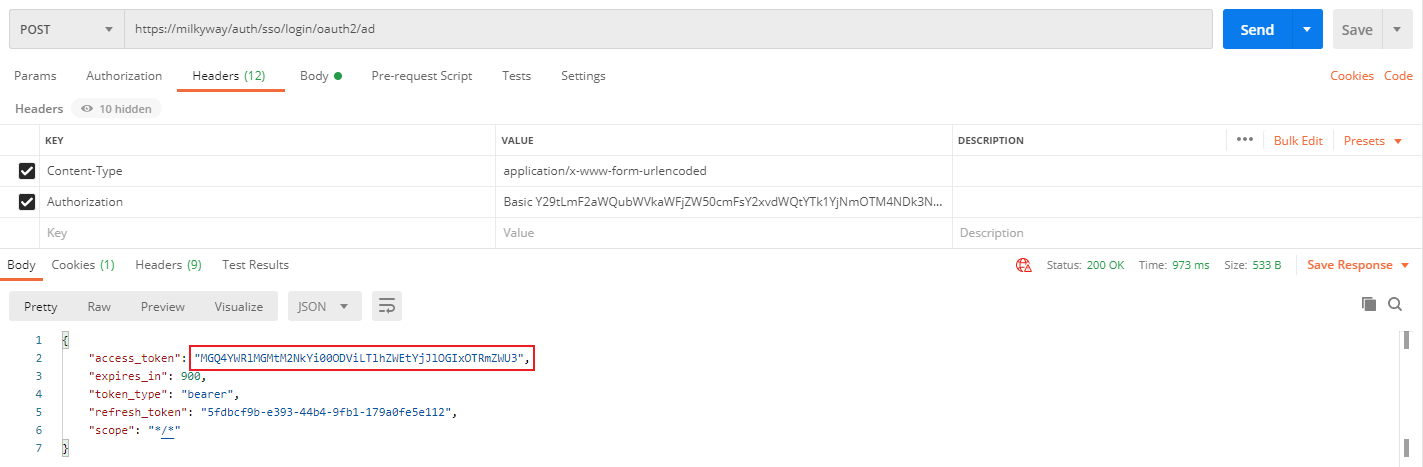
Note: by default, the access token has an expiration time of 15 minutes.
Automatically set Authentication tokens in Postman requests
When working with the APIs it's common to have to set Bearer token on each request. The usual workflow would be to create an authentication request. After getting a valid token you have to manually copy this token to header "Authorization" for each request. Below you can find the way to automate this process.
Step 1
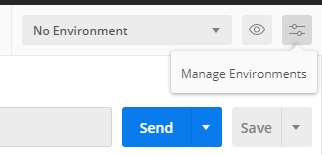
You need to manage your environment and add new set of variables:
- Click on "Manage Environments" button and click "Add" button to create new environment:
-
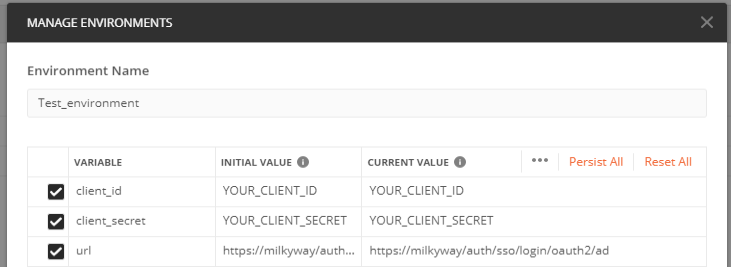
Set the name of your new environment and add necessary variables for getting access_token and click "Add" button:
- client_id = Application ID
- client_secret = Application Secret
- url = https://YOUR_CloudUX_Hostname/auth
/sso/login/oauth2/ad
Step 2
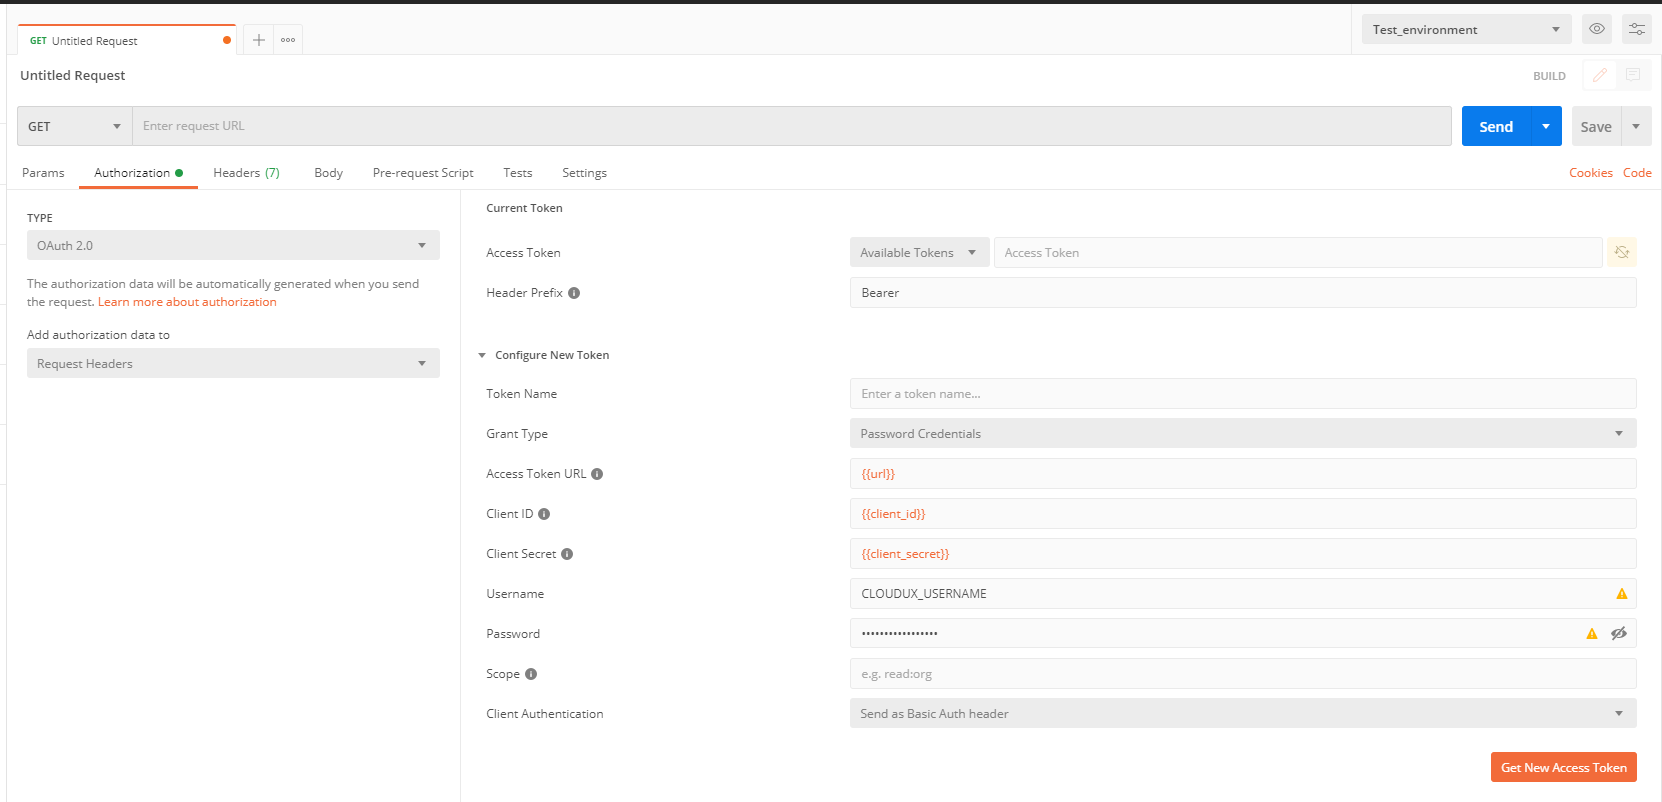
Now you can use your enviroment variables for.
- Create new request and go to "Authorization" tab.
- Choose Auth2 type of authorization and authorization data must add to Request Headers.
- Under "Current Token" set Header Prefix to Bearer.
- Under "Configure New Token":
- Set Grant Type to Password Credentials
- Access Token URL =
{{url}} - ClientID =
{{client_id}} - Client Secret =
{{client_secret}} - Username =
CLOUDUX_USERNAME - Password =
CLOUDUX_PASSWORD
- Set your environment to new you've just created.
Step 3
Try to get access token for current request.
- Click on "Get New Access Token" button and then you will see token details:
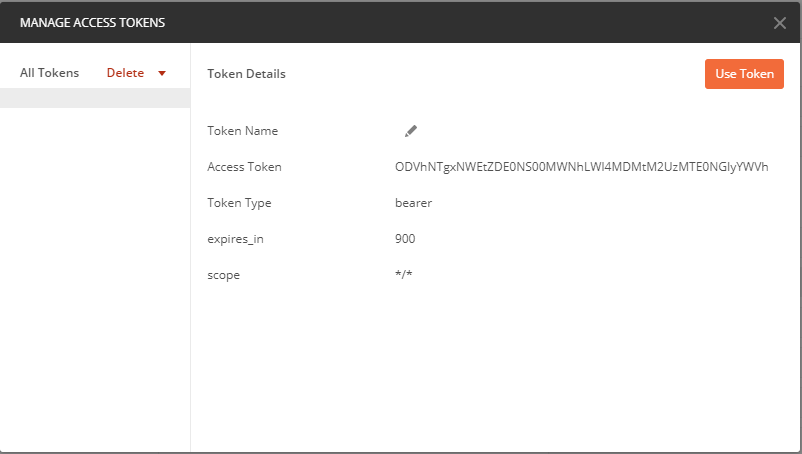
- Click "Use Token" to use this token for current request.
Enumerate all available systems
To continue with the following guides you need to know systems connected to CloudUX such as PM, AM, NM etc. For this you can do the following request.
Step 1
CloudUX has a registry service that contains list of all connected systems. Use the following request to obtain registry:serviceroots resource. The CTMS Registry collects the HAL resources provided by all the different CTMS services on the platform.
-
Open Postman App and create new request with GET method on URL:
https://CloudUX_Hostname/apis/.avid.ctms.registry; version=0;realm=global/ - Use the token obtained earlier in: Authentication step. The access token should be added to the header of the request as Authorization parameter “Bearer access token“. Pay attention to token expiration time.
- From response above, you need a link with
registry:servicerootsresource to get all information stored in the CTMS Registry.
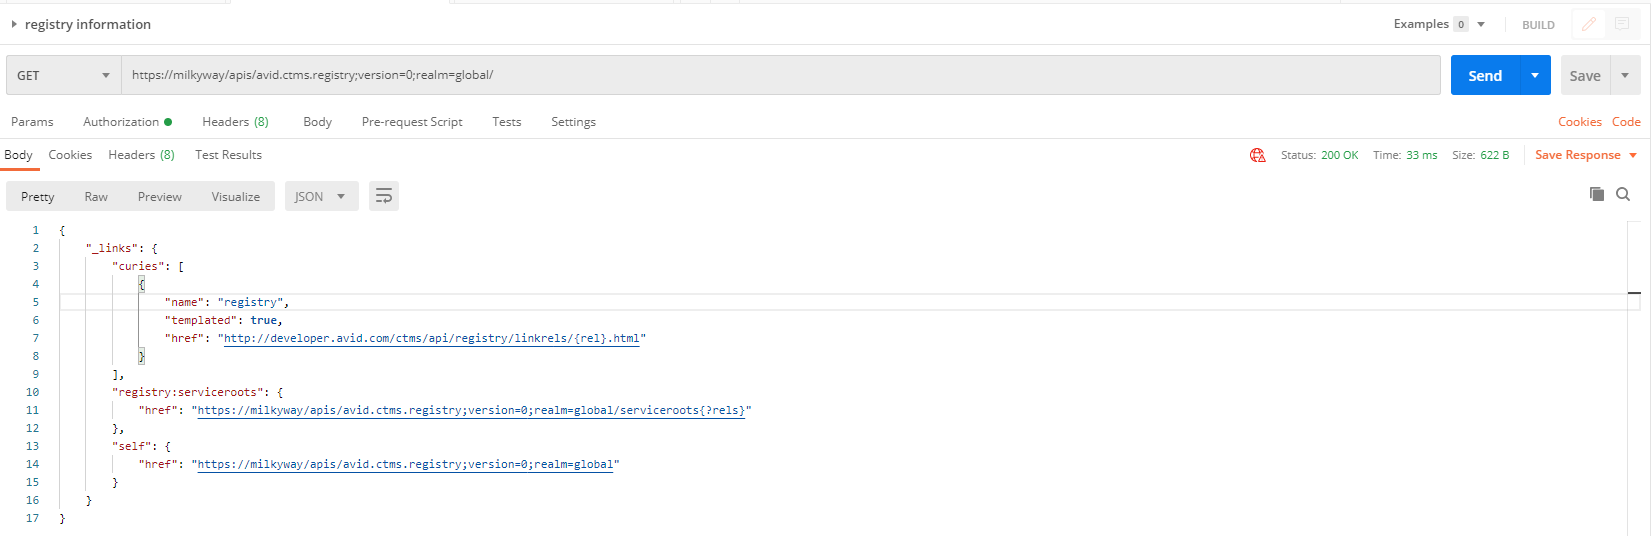
- An example response is showing below. Look for the highlighted text:
Service Root
{
    "_links": {
        "curies": [
            {
                "name": "registry",
                "templated": true,
                "href": "http://developer.avid.com/ctms/api/registry/linkrels/{rel}.html"
            }
        ],

        "registry:serviceroots": {
            "href": "https://CloudUX_Hostname/apis/avid.ctms.registry;version=0;realm=global/serviceroots{?rels}"
        },

        "self": {
            "href": "https://CloudUX_Hostname/apis/avid.ctms.registry;version=0;realm=global"
        }
    }
}
Step 2
Now making request to registry:serviceroots you can see what systems are connected to your CloudUX.
- Click on the link with
registry:servicerootsin the Postman response field. - Make GET request to enumerate the systems.
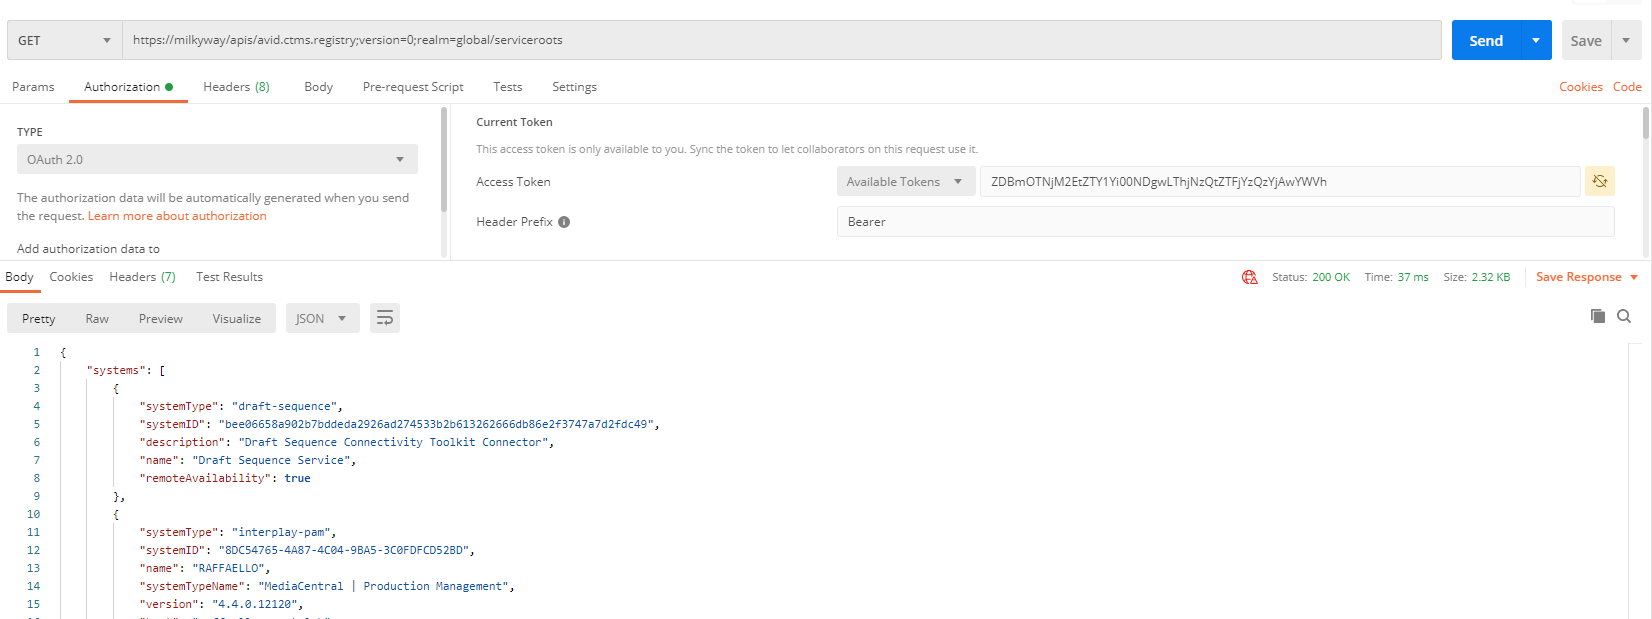
- An example response is showing below:
Full Registry Information
{
"systems": [
{
"systemType": "draft-sequence",
"systemID": "systemID",
"description": "Draft Sequence Connectivity Toolkit Connector",
"name": "Draft Sequence Service",
"remoteAvailability": true
},
{
"systemType": "interplay-pam",
"systemID": "systemID",
"name": "PAM_IP",
"systemTypeName": "MediaCentral | Production Management",
"version": "4.4.0.12120",
"host": "PAM_IP.prcrt.lab",
"properties": {
"preferredThumbnailWidth": "480",
"preferredThumbnailHeight": "272"
},
"remoteAvailability": true
},
{
"systemType": "interplay-mam",
"systemID": "systemID",
"name": "MediaCentral® | Asset Management",
"systemTypeName": "Asset Management",
"version": "7.4",
"host": "MAM",
"properties": {
"languages": [
"ar",
"de",
"en",
"en-AU",
"es",
"fr",
"it",
"ja",
"ko",
"pl",
"pt",
"ru",
"tr",
"zh"
],
"preferredThumbnailWidth": 176
},
"remoteAvailability": true
},
{
"systemType": "inews",
"systemID": "systemID",
"name": "INEWS",
"systemTypeName": "Newsroom Management",
"version": "2020.9 (build 7.7.0.52)",
"properties": {
"storyUUIDSupport": true
},
"remoteAvailability": false
},
{
"systemType": "datamodel-aggregator",
"systemID": "systemID",
"name": "Datamodel Aggregator",
"version": "0",
"remoteAvailability": true
}
],
"resources": {
"settings:settings": [
{
"href": "https://CloudUX_Hostname/apis/avid.inews;version=0;realm=INEWS/settings",
"description": "Resource provides links to functionality regarding querying iNEWS system settings.",
"systems": [
{
"systemType": "inews",
"systemID": "systemID",
"properties": {
"storyUUIDSupport": true
}
}
],
"templated": false
},
{
"href": "https://CloudUX_Hostname/apis/avid.pam;version=2;realm=8DC54765-4A87-4C04-9BA5-3C0FDFCD52BD/settings",
"description": "Entry point of the Admin API for settings.",
"systems": [
{
"systemType": "interplay-pam",
"systemID": "systemID"
}
],
"templated": false
}
],
"aa:update-attributes-by-id": [
{
"href": "https://CloudUX_Hostname/apis/avid.pam;version=2;realm=8DC54765-4A87-4C04-9BA5-3C0FDFCD52BD/assets/{id}/attributes",
"description": "update specified asset attributes",
"systems": [
{
"systemType": "interplay-pam",
"systemID": "systemID"
}
],
"templated": true
}
],
"loc:root-item": [
{
"href": "https://CloudUX_Hostname/apis/avid.inews;version=0;realm=INEWS/locations/items/[INEWS]?offset=0&limit=25",
"description": "Resource provides root item.",
"systems": [
{
"systemType": "inews",
"systemID": "systemID",
"properties": {
"storyUUIDSupport": true
}
}
],
"templated": false
},
{
"href": "https://CloudUX_Hostname/apis/avid.mam.assets.access;version=0;realm=REALM/locations/items",
"description": "access to the very root item of the locations tree",
"systems": [
{
"systemType": "interplay-mam",
"systemID": "systemID"
}
],
"templated": false
},
{
"href": "https://CloudUX_Hostname/apis/avid.pam;version=2;realm=REALM/locations/folders/%2F?offset=0&limit=25",
"description": "returns the items in the root item",
"systems": [
{
"systemType": "interplay-pam",
"systemID": "systemID"
}
],
"templated": false
}
],
"datamodel:system-model": [
{
"href": "https://CloudUX_Hostname/apis/avid.inews;version=0;realm=INEWS/system-model",
"description": "Resource represents the data model of iNEWS system.",
"systems": [
{
"systemType": "inews",
"systemID": "systemID",
"properties": {
"storyUUIDSupport": true
}
}
],
"templated": false
},
{
"href": "https://CloudUX_Hostname/apis/avid.mam.assets.access;version=0;realm=REALM/datamodel/system",
"description": "get data model information for the system",
"systems": [
{
"systemType": "interplay-mam",
"systemID": "systemID"
}
],
"templated": false
},
{
"href": "https://CloudUX_Hostname/apis/avid.pam;version=2;realm=REALM/system-model",
"description": "get data model information for the system",
"systems": [
{
"systemType": "interplay-pam",
"systemID": "systemID"
}
],
"templated": false
}
],
"taxonomies:taxonomies": [
{
"href": "https://CloudUX_Hostname/apis/avid.mam.assets.access;version=0;realm=REALM/taxonomies",
"description": "access to functionality for taxonomies",
"systems": [
{
"systemType": "interplay-mam",
"systemID": "systemID"
}
],
"templated": false
},
{
"href": "https://CloudUX_Hostname/apis/avid.pam;version=2;realm=REALM/taxonomies",
"description": "access to functionality for taxonomies",
"systems": [
{
"systemType": "interplay-pam",
"systemID": "systemID"
}
],
"templated": false
}
],
"aa:update-asset-by-id": [
{
"href": "https://CloudUX_Hostname/apis/avid.pam;version=2;realm=REALM/assets/{id}",
"description": "update specified asset",
"systems": [
{
"systemType": "interplay-pam",
"systemID": "systemID"
}
],
"templated": true
},
{
"href": "https://CloudUX_Hostname/apis/avid.draftsequence;version=1;realm=REALM/assets/{id}",
"description": "update an asset by id",
"systems": [
{
"systemType": "draft-sequence",
"systemID": "systemID"
}
],
"templated": true
}
],
"ia:users": [
{
"href": "https://CloudUX_Hostname/apis/avid.inews;version=0;realm=INEWS/users",
"description": "Resource provides links to functionality regarding querying iNEWS user data.",
"systems": [
{
"systemType": "inews",
"systemID": "systemID",
"properties": {
"storyUUIDSupport": true
}
}
],
"templated": false
}
],
"search:simple-search": [
{
"href": "https://CloudUX_Hostname/apis/avid.pam;version=2;realm=REALM/searches/simplesearch?search={search}{&offset,limit}",
"description": "get the result of a simple search",
"systems": [
{
"systemType": "interplay-pam",
"systemID": "systemID"
}
],
"templated": true
},
{
"href": "https://CloudUX_Hostname/apis/avid.mam.assets.access;version=0;realm=REALM/searches/simple?search={search}{&offset,limit,sort}",
"description": "get the result of a simple search",
"systems": [
{
"systemType": "interplay-mam",
"systemID": "systemID"
}
],
"templated": true
}
],
"aa:xmd-timeline-by-id": [
{
"href": "https://CloudUX_Hostname/apis/avid.mam.media.xmd;version=1;realm=REALM/assets/{id}",
"description": "get XMD timeline of an asset by id",
"systems": [
{
"systemType": "interplay-mam",
"systemID": "systemID"
}
],
"templated": true
}
],
"loc:item-by-id": [
{
"href": "https://CloudUX_Hostname/apis/avid.pam;version=2;realm=REALM/locations/items/{id}",
"description": "get an item by id",
"systems": [
{
"systemType": "interplay-pam",
"systemID": "systemID"
}
],
"templated": true
},
{
"href": "https://CloudUX_Hostname/apis/avid.mam.assets.access;version=0;realm=REALM/locations/items/{id}",
"description": "get an item by id",
"systems": [
{
"systemType": "interplay-mam",
"systemID": "systemID"
}
],
"templated": true
},
{
"href": "https://CloudUX_Hostname/apis/avid.inews;version=0;realm=INEWS/locations/items/{id}",
"description": "Resource provides location item by ID.",
"systems": [
{
"systemType": "inews",
"systemID": "systemID",
"properties": {
"storyUUIDSupport": true
}
}
],
"templated": true
}
],
"taxonomies:entry-by-taxonomyid-and-entryid-bulk": [
{
"href": "https://CloudUX_Hostname/apis/avid.mam.assets.access;version=0;realm=REALM/bulk/taxonomies/entry-by-taxonomyid-and-entryid",
"description": "get a list of entries of different taxonomies",
"systems": [
{
"systemType": "interplay-mam",
"systemID": "systemID"
}
],
"templated": false
}
],
"loc:folder-by-id": [
{
"href": "https://CloudUX_Hostname/apis/avid.mam.assets.access;version=0;realm=REALM/locations/items/{id}",
"description": "get a folder by id",
"systems": [
{
"systemType": "interplay-mam",
"systemID": "systemID"
}
],
"templated": true
},
{
"href": "https://CloudUX_Hostname/apis/avid.inews;version=0;realm=INEWS/locations/items/{id}",
"description": "Resource provides location folder by ID.",
"systems": [
{
"systemType": "inews",
"systemID": "systemID",
"properties": {
"storyUUIDSupport": true
}
}
],
"templated": true
}
],
"loc:locations": [
{
"href": "https://CloudUX_Hostname/apis/avid.inews;version=0;realm=INEWS/locations",
"description": "Resource provides links to functionality regarding a folder structure to be displayed for a system.",
"systems": [
{
"systemType": "inews",
"systemID": "systemID",
"properties": {
"storyUUIDSupport": true
}
}
],
"templated": false
},
{
"href": "https://CloudUX_Hostname/apis/avid.pam;version=2;realm=REALM/locations",
"description": "access to location related functionality",
"systems": [
{
"systemType": "interplay-pam",
"systemID": "systemID"
}
],
"templated": false
},
{
"href": "https://CloudUX_Hostname/apis/avid.mam.assets.access;version=0;realm=REALM/locations",
"description": "access to location related functionality",
"systems": [
{
"systemType": "interplay-mam",
"systemID": "systemID"
}
],
"templated": false
}
],
"ia:queues": [
{
"href": "https://CloudUX_Hostname/apis/avid.inews;version=0;realm=INEWS/queues",
"description": "Resource provides links to functionality regarding querying and manipulating iNEWS Queues.",
"systems": [
{
"systemType": "inews",
"systemID": "systemID",
"properties": {
"storyUUIDSupport": true
}
}
],
"templated": false
}
],
"aa:assets": [
{
"href": "https://CloudUX_Hostname/apis/avid.pam;version=2;realm=REALM/assets",
"description": "access to asset related functionality",
"systems": [
{
"systemType": "interplay-pam",
"systemID": "systemID"
}
],
"templated": false
},
{
"href": "https://CloudUX_Hostname/apis/avid.mam.assets.access;version=0;realm=REALM/assets",
"description": "access to asset related functionality",
"systems": [
{
"systemType": "interplay-mam",
"systemID": "systemID"
}
],
"templated": false
},
{
"href": "https://CloudUX_Hostname/apis/avid.inews;version=0;realm=INEWS/assets",
"description": "Resource provides links to functionality regarding querying and manipulating assets.",
"systems": [
{
"systemType": "inews",
"systemID": "systemID",
"properties": {
"storyUUIDSupport": true
}
}
],
"templated": false
},
{
"href": "https://CloudUX_Hostname/apis/avid.draftsequence;version=1;realm=REALM/assets",
"systems": [
{
"systemType": "draft-sequence",
"systemID": "systemID"
}
],
"templated": true
}
],
"aa:folders": [
{
"href": "https://CloudUX_Hostname/apis/avid.inews;version=0;realm=INEWS/folders",
"description": "Resource provides links to functionality regarding querying and manipulating folders.",
"systems": [
{
"systemType": "inews",
"systemID": "systemID",
"properties": {
"storyUUIDSupport": true
}
}
],
"templated": false
}
],
"datamodel:asset-model-by-id": [
{
"href": "https://CloudUX_Hostname/apis/avid.mam.assets.access;version=0;realm=REALM/datamodel/asset/{id}",
"description": "get an assets's asset-model by id",
"systems": [
{
"systemType": "interplay-mam",
"systemID": "systemID"
}
],
"templated": true
},
{
"href": "https://CloudUX_Hostname/apis/avid.pam;version=2;realm=REALM/asset-model/{id}",
"description": "returns data model of specified asset",
"systems": [
{
"systemType": "interplay-pam",
"systemID": "systemID"
}
],
"templated": true
}
],
"taxonomies:taxonomy-by-taxonomyid": [
{
"href": "https://CloudUX_Hostname/apis/avid.mam.assets.access;version=0;realm=REALM/taxonomies/{taxonomyid}",
"description": "get a taxonomy by it's ID",
"systems": [
{
"systemType": "interplay-mam",
"systemID": "systemID"
}
],
"templated": true
},
{
"href": "https://CloudUX_Hostname/apis/avid.pam;version=2;realm=REALM/taxonomies/{taxonomyid}",
"description": "get a taxonomy by it's ID",
"systems": [
{
"systemType": "interplay-pam",
"systemID": "systemID"
}
],
"templated": true
}
],
"pa:storage": [
{
"href": "https://CloudUX_Hostname/apis/avid.pam;version=2;realm=REALM/storage",
"description": "Returns information about storage.",
"systems": [
{
"systemType": "interplay-pam",
"systemID": "systemID"
}
],
"templated": false
}
],
"ia:monitors": [
{
"href": "https://CloudUX_Hostname/apis/avid.inews;version=0;realm=INEWS/monitors",
"description": "Resource provides links to functionality regarding querying and manipulating iNEWS Monitors.",
"systems": [
{
"systemType": "inews",
"systemID": "systemID",
"properties": {
"storyUUIDSupport": true
}
}
],
"templated": false
}
],
"aa:delete-asset-by-id": [
{
"href": "https://CloudUX_Hostname/apis/avid.draftsequence;version=1;realm=REALM/assets/{id}",
"description": "delete an asset by id",
"systems": [
{
"systemType": "draft-sequence",
"systemID": "systemID"
}
],
"templated": true
}
],
"ia:system": [
{
"href": "https://CloudUX_Hostname/apis/avid.inews;version=0;realm=INEWS/system",
"description": "Resource provides links to functionality regarding querying iNEWS system data.",
"systems": [
{
"systemType": "inews",
"systemID": "systemID",
"properties": {
"storyUUIDSupport": true
}
}
],
"templated": false
}
],
"aa:asset-by-id": [
{
"href": "https://CloudUX_Hostname/apis/avid.mam.assets.access;version=0;realm=REALM/assets/{id}",
"description": "get an asset by id",
"systems": [
{
"systemType": "interplay-mam",
"systemID": "systemID"
}
],
"templated": true
},
{
"href": "https://CloudUX_Hostname/apis/avid.pam;version=2;realm=REALM/assets/{id}",
"description": "get an asset by id",
"systems": [
{
"systemType": "interplay-pam",
"systemID": "systemID"
}
],
"templated": true
},
{
"href": "https://CloudUX_Hostname/apis/avid.draftsequence;version=1;realm=REALM/assets/{id}",
"description": "get an asset by id",
"systems": [
{
"systemType": "draft-sequence",
"systemID": "systemID"
}
],
"templated": true
},
{
"href": "https://CloudUX_Hostname/apis/avid.inews;version=0;realm=INEWS/assets/{id}",
"description": "Resource provides asset by ID.",
"systems": [
{
"systemType": "inews",
"systemID": "systemID",
"properties": {
"storyUUIDSupport": true
}
}
],
"templated": true
}
],
"pa:extended": [
{
"href": "https://CloudUX_Hostname/apis/avid.pam.extended;version=1;realm=REALM/extended",
"description": "additional PAM related operations",
"systems": [
{
"systemType": "interplay-pam",
"systemID": "systemID"
}
],
"templated": false
}
],
"aa:create-asset": [
{
"href": "https://CloudUX_Hostname/apis/avid.draftsequence;version=1;realm=REALM/assets",
"description": "create a new asset",
"systems": [
{
"systemType": "draft-sequence",
"systemID": "systemID"
}
],
"templated": false
}
],
"search:searches": [
{
"href": "https://CloudUX_Hostname/apis/avid.inews;version=0;realm=INEWS/searches",
"description": "Resource provides links to functionality regarding searches for assets and folders in a system.",
"systems": [
{
"systemType": "inews",
"systemID": "systemID",
"properties": {
"storyUUIDSupport": true
}
}
],
"templated": false
},
{
"href": "https://CloudUX_Hostname/apis/avid.mam.assets.access;version=0;realm=REALM/searches",
"description": "access to search related functionality",
"systems": [
{
"systemType": "interplay-mam",
"systemID": "systemID"
}
],
"templated": false
},
{
"href": "https://CloudUX_Hostname/apis/avid.pam;version=2;realm=REALM/searches",
"description": "access to search related functionality",
"systems": [
{
"systemType": "interplay-pam",
"systemID": "systemID"
}
],
"templated": false
}
],
"datamodel:aggregated-model": [
{
"href": "https://CloudUX_Hostname/apis/avid.ctms.datamodel.aggregator;version=0;realm=global/aggregateddatamodel{?lang}",
"description": "get aggregated data model",
"systems": [
{
"systemType": "datamodel-aggregator",
"systemID": "systemID"
}
],
"templated": true
}
],
"taxonomies:entry-by-taxonomyid-and-entryid": [
{
"href": "https://CloudUX_Hostname/apis/avid.mam.assets.access;version=0;realm=REALM/taxonomies/{taxonomyid}/entries/{entryid}",
"description": "get an entry of a taxonomy by it's ID",
"systems": [
{
"systemType": "interplay-mam",
"systemID": "systemID"
}
],
"templated": true
},
{
"href": "https://CloudUX_Hostname/apis/avid.pam;version=2;realm=REALM/taxonomiestaxonomies/{taxonomyid}/entries/{taxonomyentryid}",
"description": "get an entry of a taxonomy by it's ID",
"systems": [
{
"systemType": "interplay-pam",
"systemID": "systemID"
}
],
"templated": true
}
]
},
"_links": {
"curies": [
{
"templated": true,
"name": "aa",
"href": "http://developer.avid.com/ctms/api/aa/linkrels/{rel}.html"
},
{
"templated": true,
"name": "datamodel",
"href": "http://developer.avid.com/ctms/api/datamodel/linkrels/{rel}.html"
},
{
"templated": true,
"name": "ia",
"href": "http://developer.avid.com/ctms/api/ia/linkrels/{rel}.html"
},
{
"templated": true,
"name": "loc",
"href": "http://developer.avid.com/ctms/api/loc/linkrels/{rel}.html"
},
{
"templated": true,
"name": "search",
"href": "http://developer.avid.com/ctms/api/search/linkrels/{rel}.html"
},
{
"templated": true,
"name": "settings",
"href": "http://developer.avid.com/ctms/api/settings/linkrels/{rel}.html"
},
{
"templated": true,
"name": "pa",
"href": "http://developer.avid.com/ctms/api/pa/linkrels/{rel}.html"
},
{
"templated": true,
"name": "taxonomies",
"href": "http://developer.avid.com/ctms/api/taxonomies/linkrels/{rel}.html"
},
{
"templated": true,
"name": "ma",
"href": "http://developer.avid.com/ctms/api/ma/linkrels/{rel}.html"
}
],
"self": {
"href": "https://CloudUX_Hostname/apis/avid.ctms.registry;version=0;realm=global/serviceroots"
}
}
}
See more information about CTMS Registry: Using the CTMS Registry as a Client
List items in folder
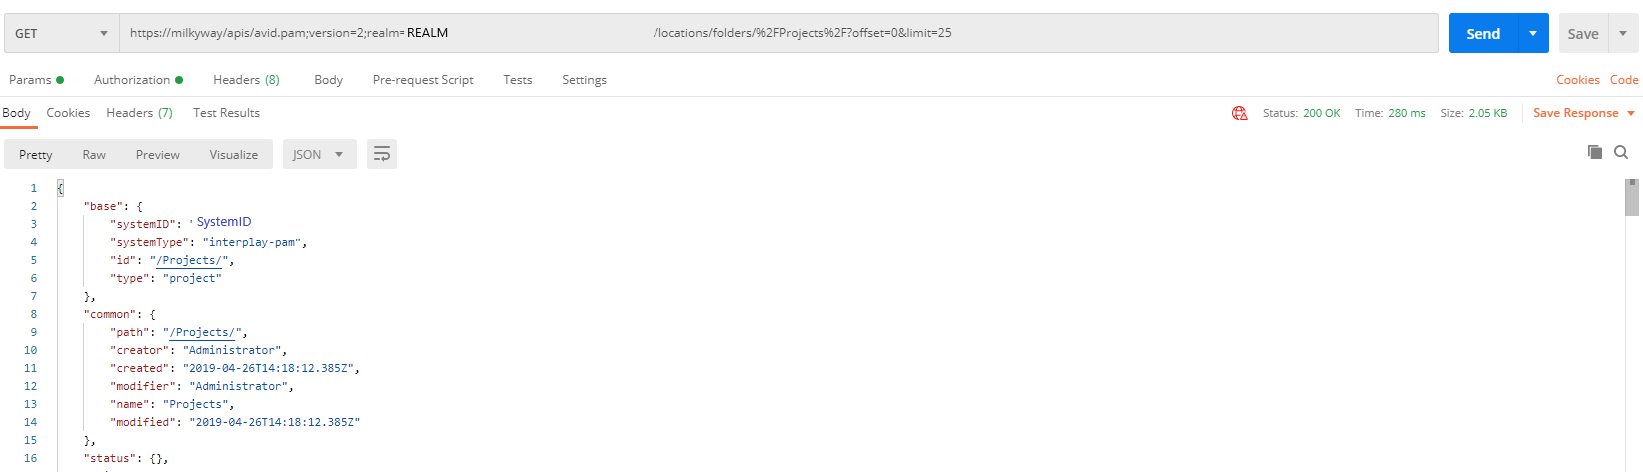
To get the item of the folder structure and list items in this folder you can do the following requests.
Step 1
To list items in the root folder you need to use response from the step above: Enumerate all available systems
- Once you get response for the link with relation
registry:servicerootsyou are ready to display items in the root folder. - Find link with relation
loc:root-item.Note: "SystemType" parameter under "system" section must be set to "interplay-pam".
- Click on the link and make GET request to see items from root folder.
- Use the token obtained earlier in: Authentication step. The access token should be added to the header of the request as Authorization parameter “Bearer access token“. Pay attention to token expiration time.

- An example response is showing below:
Response for Production Management: root item
{
"base": {
"systemID": "systemID",
"systemType": "interplay-pam",
"id": "/",
"type": "folder"
},
"common": {
"path": "/",
"creator": "Administrator",
"created": "1997-06-16T11:00:00Z",
"name": "AvidWG",
"modified": "2019-04-26T14:18:13.867Z"
},
"status": {},
"_links": {
"self": {
"href": "https://CloudUX_Hostname/apis/avid.pam;version=2;;realm=REALM/locations/folders/%2F?offset=0&limit=25"
},
"loc:collection": {
"href": "https://CloudUX_Hostname/apis/avid.pam;version=2;;realm=REALM/locations/folders/collection/%2F?offset=0&limit=25"
},
"loc:locations": {
"href": "https://CloudUX_Hostname/apis/avid.pam;version=2;;realm=REALM/locations"
},
"pa:reservations": {
"href": "https://CloudUX_Hostname/apis/avid.pam;version=2;;realm=REALM/locations/folders/reservations/%2F"
},
"loc:create-folder": {
"href": "https://CloudUX_Hostname/apis/avid.pam;version=2;;realm=REALM/locations/folders/%2F?offset=0&limit=25"
},
"loc:update-item": {
"href": "https://CloudUX_Hostname/apis/avid.pam;version=2;;realm=REALM/locations/items/%2F?offset=0&limit=25"
},
"loc:delete-item-in-folder-by-id-bulk-command": {
"href": "https://CloudUX_Hostname/apis/avid.pam;version=2;;realm=REALM/locations/folders/%2F/command/delete-items"
},
"loc:add-item": {
"href": "https://CloudUX_Hostname/apis/avid.pam;version=2;;realm=REALM/locations/operations/add/%2F"
},
"loc:move-item": {
"href": "https://CloudUX_Hostname/apis/avid.pam;version=2;;realm=REALM/locations/operations/move/%2F"
},
"loc:add-items": {
"href": "https://CloudUX_Hostname/apis/avid.pam;version=2;;realm=REALM/locations/operations/add-items/%2F"
},
"loc:move-items": {
"href": "https://CloudUX_Hostname/apis/avid.pam;version=2;;realm=REALM/locations/operations/move-items/%2F"
},
"pa:upload-file": {
"href": "https://CloudUX_Hostname/asset/pam/file/upload"
},
"pa:import-asset-command": {
"href": "https://CloudUX_Hostname/apis/avid.pam;version=2;;realm=REALM/locations/folders/%2F/command/import-asset"
},
"loc:path-to-root": {
"href": "https://CloudUX_Hostname/apis/avid.pam;version=2;;realm=REALM/locations/path/folder/%2F"
},
"loc:parent-folder": {
"href": "https://CloudUX_Hostname/apis/avid.pam;version=2;;realm=REALM/locations/folders/parent/%2F"
},
"loc:parent-collection": {
"href": "https://CloudUX_Hostname/apis/avid.pam;version=2;;realm=REALM/locations/folders/parent/collection/%2F"
},
"loc:collection-at-itemid": {
"href": "https://CloudUX_Hostname/apis/avid.pam;version=2;;realm=REALM/locations/folders/collection/%2F/at/{itemid}",
"templated": true
},
"curies": [
{
"name": "loc",
"href": "http://developer.avid.com/ctms/api/loc/linkrels/{rel}.html",
"templated": true
},
{
"name": "aa",
"href": "http://developer.avid.com/ctms/api/aa/linkrels/{rel}.html",
"templated": true
},
{
"name": "pa",
"href": "http://developer.avid.com/ctms/api/pa/linkrels/{rel}.html",
"templated": true
}
]
},
"_embedded": {
"loc:collection": {
"paging": {
"limit": 25,
"offset": 0,
"elements": 9,
"totalElements": 9
},
"_links": {
"self": {
"href": "https://CloudUX_Hostname/apis/avid.pam;version=2;;realm=REALM/locations/folders/collection/%2F?offset=0&limit=25"
},
"first": {
"href": "https://CloudUX_Hostname/apis/avid.pam;version=2;;realm=REALM/locations/folders/collection/%2F?offset=0&limit=25"
},
"loc:locations": {
"href": "https://CloudUX_Hostname/apis/avid.pam;version=2;;realm=REALM/locations"
},
"curies": [
{
"name": "loc",
"href": "http://developer.avid.com/ctms/api/loc/linkrels/{rel}.html",
"templated": true
},
{
"name": "aa",
"href": "http://developer.avid.com/ctms/api/aa/linkrels/{rel}.html",
"templated": true
},
{
"name": "pa",
"href": "http://developer.avid.com/ctms/api/pa/linkrels/{rel}.html",
"templated": true
}
],
"loc:item": [
{
"href": "https://CloudUX_Hostname/apis/avid.pam;version=2;;realm=REALM/locations/folders/%2FProjects%2F?offset=0&limit=25"
},
{
"href": "https://CloudUX_Hostname/apis/avid.pam;version=2;;realm=REALM/locations/folders/%2FCatalogs%2F?offset=0&limit=25"
},
{
"href": "https://CloudUX_Hostname/apis/avid.pam;version=2;;realm=REALM/locations/folders/%2FIncoming%20Media%2F?offset=0&limit=25"
},
{
"href": "https://CloudUX_Hostname/apis/avid.pam;version=2;;realm=REALM/locations/folders/%2FSent%20to%20Playback%2F?offset=0&limit=25"
},
{
"href": "https://CloudUX_Hostname/apis/avid.pam;version=2;;realm=REALM/locations/folders/%2FOrphan%20Clips%2F?offset=0&limit=25"
},
{
"href": "https://CloudUX_Hostname/apis/avid.pam;version=2;;realm=REALM/locations/folders/%2FUnchecked-in%20Avid%20Assets%2F?offset=0&limit=25"
},
{
"href": "https://CloudUX_Hostname/apis/avid.pam;version=2;;realm=REALM/locations/folders/%2FNearchive%20on%20NLT-NEARCHIVE%2F?offset=0&limit=25"
},
{
"href": "https://CloudUX_Hostname/apis/avid.pam;version=2;;realm=REALM/locations/folders/%2FAutomated_tests_1623677877406%2F?offset=0&limit=25"
},
{
"href": "https://CloudUX_Hostname/apis/avid.pam;version=2;;realm=REALM/locations/folders/%2FAutomated_tests_1623678113314%2F?offset=0&limit=25"
}
]
},
"_embedded": {
"loc:item": [
{
"base": {
"systemID": "systemID",
"systemType": "interplay-pam",
"id": "/Projects/",
"type": "project"
},
"common": {
"path": "/Projects/",
"creator": "Administrator",
"created": "2019-04-26T14:18:12.385Z",
"modifier": "Administrator",
"name": "Projects",
"modified": "2019-04-26T14:18:12.385Z"
},
"status": {},
"_links": {
"self": {
"href": "https://CloudUX_Hostname/apis/avid.pam;version=2;;realm=REALM/locations/folders/%2FProjects%2F?offset=0&limit=25"
},
"loc:collection": {
"href": "https://CloudUX_Hostname/apis/avid.pam;version=2;;realm=REALM/locations/folders/collection/%2FProjects%2F?offset=0&limit=25"
},
"loc:locations": {
"href": "https://CloudUX_Hostname/apis/avid.pam;version=2;;realm=REALM/locations"
},
"pa:reservations": {
"href": "https://CloudUX_Hostname/apis/avid.pam;version=2;;realm=REALM/locations/folders/reservations/%2FProjects%2F"
},
"loc:create-folder": {
"href": "https://CloudUX_Hostname/apis/avid.pam;version=2;;realm=REALM/locations/folders/%2FProjects%2F?offset=0&limit=25"
},
"loc:update-item": {
"href": "https://CloudUX_Hostname/apis/avid.pam;version=2;;realm=REALM/locations/items/%2FProjects%2F?offset=0&limit=25"
},
"loc:delete-item-in-folder-by-id-bulk-command": {
"href": "https://CloudUX_Hostname/apis/avid.pam;version=2;;realm=REALM/locations/folders/%2FProjects%2F/command/delete-items"
},
"loc:add-item": {
"href": "https://CloudUX_Hostname/apis/avid.pam;version=2;;realm=REALM/locations/operations/add/%2FProjects%2F"
},
"loc:move-item": {
"href": "https://CloudUX_Hostname/apis/avid.pam;version=2;;realm=REALM/locations/operations/move/%2FProjects%2F"
},
"loc:add-items": {
"href": "https://CloudUX_Hostname/apis/avid.pam;version=2;;realm=REALM/locations/operations/add-items/%2FProjects%2F"
},
"loc:move-items": {
"href": "https://CloudUX_Hostname/apis/avid.pam;version=2;;realm=REALM/locations/operations/move-items/%2FProjects%2F"
},
"pa:upload-file": {
"href": "https://CloudUX_Hostname/asset/pam/file/upload"
},
"pa:import-asset-command": {
"href": "https://CloudUX_Hostname/apis/avid.pam;version=2;;realm=REALM/locations/folders/%2FProjects%2F/command/import-asset"
},
"loc:path-to-root": {
"href": "https://CloudUX_Hostname/apis/avid.pam;version=2;;realm=REALM/locations/path/folder/%2FProjects%2F"
},
"loc:parent-folder": {
"href": "https://CloudUX_Hostname/apis/avid.pam;version=2;;realm=REALM/locations/folders/parent/%2FProjects%2F"
},
"loc:parent-collection": {
"href": "https://CloudUX_Hostname/apis/avid.pam;version=2;;realm=REALM/locations/folders/parent/collection/%2FProjects%2F"
},
"loc:collection-at-itemid": {
"href": "https://CloudUX_Hostname/apis/avid.pam;version=2;;realm=REALM/locations/folders/collection/%2FProjects%2F/at/{itemid}",
"templated": true
}
}
},
{
"base": {
"systemID": "systemID",
"systemType": "interplay-pam",
"id": "/Catalogs/",
"type": "catalog"
},
"common": {
"path": "/Catalogs/",
"creator": "Administrator",
"created": "2019-04-26T14:18:12.414Z",
"modifier": "Administrator",
"name": "Catalogs",
"modified": "2019-04-26T14:18:12.414Z"
},
"status": {},
"_links": {
"self": {
"href": "https://CloudUX_Hostname/apis/avid.pam;version=2;;realm=REALM/locations/folders/%2FCatalogs%2F?offset=0&limit=25"
},
"loc:collection": {
"href": "https://CloudUX_Hostname/apis/avid.pam;version=2;;realm=REALM/locations/folders/collection/%2FCatalogs%2F?offset=0&limit=25"
},
"loc:locations": {
"href": "https://CloudUX_Hostname/apis/avid.pam;version=2;;realm=REALM/locations"
},
"pa:reservations": {
"href": "https://CloudUX_Hostname/apis/avid.pam;version=2;;realm=REALM/locations/folders/reservations/%2FCatalogs%2F"
},
"loc:create-folder": {
"href": "https://CloudUX_Hostname/apis/avid.pam;version=2;;realm=REALM/locations/folders/%2FCatalogs%2F?offset=0&limit=25"
},
"loc:update-item": {
"href": "https://CloudUX_Hostname/apis/avid.pam;version=2;;realm=REALM/locations/items/%2FCatalogs%2F?offset=0&limit=25"
},
"loc:delete-item-in-folder-by-id-bulk-command": {
"href": "https://CloudUX_Hostname/apis/avid.pam;version=2;;realm=REALM/locations/folders/%2FCatalogs%2F/command/delete-items"
},
"loc:add-item": {
"href": "https://CloudUX_Hostname/apis/avid.pam;version=2;;realm=REALM/locations/operations/add/%2FCatalogs%2F"
},
"loc:move-item": {
"href": "https://CloudUX_Hostname/apis/avid.pam;version=2;;realm=REALM/locations/operations/move/%2FCatalogs%2F"
},
"loc:add-items": {
"href": "https://CloudUX_Hostname/apis/avid.pam;version=2;;realm=REALM/locations/operations/add-items/%2FCatalogs%2F"
},
"loc:move-items": {
"href": "https://CloudUX_Hostname/apis/avid.pam;version=2;;realm=REALM/locations/operations/move-items/%2FCatalogs%2F"
},
"pa:upload-file": {
"href": "https://CloudUX_Hostname/asset/pam/file/upload"
},
"pa:import-asset-command": {
"href": "https://CloudUX_Hostname/apis/avid.pam;version=2;;realm=REALM/locations/folders/%2FCatalogs%2F/command/import-asset"
},
"loc:path-to-root": {
"href": "https://CloudUX_Hostname/apis/avid.pam;version=2;;realm=REALM/locations/path/folder/%2FCatalogs%2F"
},
"loc:parent-folder": {
"href": "https://CloudUX_Hostname/apis/avid.pam;version=2;;realm=REALM/locations/folders/parent/%2FCatalogs%2F"
},
"loc:parent-collection": {
"href": "https://CloudUX_Hostname/apis/avid.pam;version=2;;realm=REALM/locations/folders/parent/collection/%2FCatalogs%2F"
},
"loc:collection-at-itemid": {
"href": "https://CloudUX_Hostname/apis/avid.pam;version=2;;realm=REALM/locations/folders/collection/%2FCatalogs%2F/at/{itemid}",
"templated": true
}
}
},
{
"base": {
"systemID": "systemID",
"systemType": "interplay-pam",
"id": "/Incoming Media/",
"type": "workspace"
},
"common": {
"path": "/Incoming Media/",
"creator": "Administrator",
"created": "2019-04-26T14:18:12.431Z",
"modifier": "Administrator",
"name": "Incoming Media",
"modified": "2019-04-26T14:18:12.431Z"
},
"status": {},
"_links": {
"self": {
"href": "https://CloudUX_Hostname/apis/avid.pam;version=2;;realm=REALM/locations/folders/%2FIncoming%20Media%2F?offset=0&limit=25"
},
"loc:collection": {
"href": "https://CloudUX_Hostname/apis/avid.pam;version=2;;realm=REALM/locations/folders/collection/%2FIncoming%20Media%2F?offset=0&limit=25"
},
"loc:locations": {
"href": "https://CloudUX_Hostname/apis/avid.pam;version=2;;realm=REALM/locations"
},
"pa:reservations": {
"href": "https://CloudUX_Hostname/apis/avid.pam;version=2;;realm=REALM/locations/folders/reservations/%2FIncoming%20Media%2F"
},
"loc:create-folder": {
"href": "https://CloudUX_Hostname/apis/avid.pam;version=2;;realm=REALM/locations/folders/%2FIncoming%20Media%2F?offset=0&limit=25"
},
"loc:update-item": {
"href": "https://CloudUX_Hostname/apis/avid.pam;version=2;;realm=REALM/locations/items/%2FIncoming%20Media%2F?offset=0&limit=25"
},
"loc:delete-item-in-folder-by-id-bulk-command": {
"href": "https://CloudUX_Hostname/apis/avid.pam;version=2;;realm=REALM/locations/folders/%2FIncoming%20Media%2F/command/delete-items"
},
"loc:add-item": {
"href": "https://CloudUX_Hostname/apis/avid.pam;version=2;;realm=REALM/locations/operations/add/%2FIncoming%20Media%2F"
},
"loc:move-item": {
"href": "https://CloudUX_Hostname/apis/avid.pam;version=2;;realm=REALM/locations/operations/move/%2FIncoming%20Media%2F"
},
"loc:add-items": {
"href": "https://CloudUX_Hostname/apis/avid.pam;version=2;;realm=REALM/locations/operations/add-items/%2FIncoming%20Media%2F"
},
"loc:move-items": {
"href": "https://CloudUX_Hostname/apis/avid.pam;version=2;;realm=REALM/locations/operations/move-items/%2FIncoming%20Media%2F"
},
"pa:upload-file": {
"href": "https://CloudUX_Hostname/asset/pam/file/upload"
},
"pa:import-asset-command": {
"href": "https://CloudUX_Hostname/apis/avid.pam;version=2;;realm=REALM/locations/folders/%2FIncoming%20Media%2F/command/import-asset"
},
"loc:path-to-root": {
"href": "https://CloudUX_Hostname/apis/avid.pam;version=2;;realm=REALM/locations/path/folder/%2FIncoming%20Media%2F"
},
"loc:parent-folder": {
"href": "https://CloudUX_Hostname/apis/avid.pam;version=2;;realm=REALM/locations/folders/parent/%2FIncoming%20Media%2F"
},
"loc:parent-collection": {
"href": "https://CloudUX_Hostname/apis/avid.pam;version=2;;realm=REALM/locations/folders/parent/collection/%2FIncoming%20Media%2F"
},
"loc:collection-at-itemid": {
"href": "https://CloudUX_Hostname/apis/avid.pam;version=2;;realm=REALM/locations/folders/collection/%2FIncoming%20Media%2F/at/{itemid}",
"templated": true
}
}
},
{
"base": {
"systemID": "systemID",
"systemType": "interplay-pam",
"id": "/Sent to Playback/",
"type": "playbackdevices"
},
"common": {
"path": "/Sent to Playback/",
"creator": "Administrator",
"created": "2019-04-26T14:18:12.445Z",
"modifier": "Administrator",
"name": "Sent to Playback",
"modified": "2019-04-26T14:18:12.445Z"
},
"status": {},
"_links": {
"self": {
"href": "https://CloudUX_Hostname/apis/avid.pam;version=2;;realm=REALM/locations/folders/%2FSent%20to%20Playback%2F?offset=0&limit=25"
},
"loc:collection": {
"href": "https://CloudUX_Hostname/apis/avid.pam;version=2;;realm=REALM/locations/folders/collection/%2FSent%20to%20Playback%2F?offset=0&limit=25"
},
"loc:locations": {
"href": "https://CloudUX_Hostname/apis/avid.pam;version=2;;realm=REALM/locations"
},
"pa:reservations": {
"href": "https://CloudUX_Hostname/apis/avid.pam;version=2;;realm=REALM/locations/folders/reservations/%2FSent%20to%20Playback%2F"
},
"loc:create-folder": {
"href": "https://CloudUX_Hostname/apis/avid.pam;version=2;;realm=REALM/locations/folders/%2FSent%20to%20Playback%2F?offset=0&limit=25"
},
"loc:update-item": {
"href": "https://CloudUX_Hostname/apis/avid.pam;version=2;;realm=REALM/locations/items/%2FSent%20to%20Playback%2F?offset=0&limit=25"
},
"loc:delete-item-in-folder-by-id-bulk-command": {
"href": "https://CloudUX_Hostname/apis/avid.pam;version=2;;realm=REALM/locations/folders/%2FSent%20to%20Playback%2F/command/delete-items"
},
"loc:add-item": {
"href": "https://CloudUX_Hostname/apis/avid.pam;version=2;;realm=REALM/locations/operations/add/%2FSent%20to%20Playback%2F"
},
"loc:move-item": {
"href": "https://CloudUX_Hostname/apis/avid.pam;version=2;;realm=REALM/locations/operations/move/%2FSent%20to%20Playback%2F"
},
"loc:add-items": {
"href": "https://CloudUX_Hostname/apis/avid.pam;version=2;;realm=REALM/locations/operations/add-items/%2FSent%20to%20Playback%2F"
},
"loc:move-items": {
"href": "https://CloudUX_Hostname/apis/avid.pam;version=2;;realm=REALM/locations/operations/move-items/%2FSent%20to%20Playback%2F"
},
"pa:upload-file": {
"href": "https://CloudUX_Hostname/asset/pam/file/upload"
},
"pa:import-asset-command": {
"href": "https://CloudUX_Hostname/apis/avid.pam;version=2;;realm=REALM/locations/folders/%2FSent%20to%20Playback%2F/command/import-asset"
},
"loc:path-to-root": {
"href": "https://CloudUX_Hostname/apis/avid.pam;version=2;;realm=REALM/locations/path/folder/%2FSent%20to%20Playback%2F"
},
"loc:parent-folder": {
"href": "https://CloudUX_Hostname/apis/avid.pam;version=2;;realm=REALM/locations/folders/parent/%2FSent%20to%20Playback%2F"
},
"loc:parent-collection": {
"href": "https://CloudUX_Hostname/apis/avid.pam;version=2;;realm=REALM/locations/folders/parent/collection/%2FSent%20to%20Playback%2F"
},
"loc:collection-at-itemid": {
"href": "https://CloudUX_Hostname/apis/avid.pam;version=2;;realm=REALM/locations/folders/collection/%2FSent%20to%20Playback%2F/at/{itemid}",
"templated": true
}
}
},
{
"base": {
"systemID": "systemID",
"systemType": "interplay-pam",
"id": "/Orphan Clips/",
"type": "aviddisassociatedmedia"
},
"common": {
"path": "/Orphan Clips/",
"creator": "Administrator",
"created": "2019-04-26T14:18:12.458Z",
"modifier": "Administrator",
"name": "Orphan Clips",
"modified": "2019-04-26T14:18:12.458Z"
},
"status": {},
"_links": {
"self": {
"href": "https://CloudUX_Hostname/apis/avid.pam;version=2;;realm=REALM/locations/folders/%2FOrphan%20Clips%2F?offset=0&limit=25"
},
"loc:collection": {
"href": "https://CloudUX_Hostname/apis/avid.pam;version=2;;realm=REALM/locations/folders/collection/%2FOrphan%20Clips%2F?offset=0&limit=25"
},
"loc:locations": {
"href": "https://CloudUX_Hostname/apis/avid.pam;version=2;;realm=REALM/locations"
},
"pa:reservations": {
"href": "https://CloudUX_Hostname/apis/avid.pam;version=2;;realm=REALM/locations/folders/reservations/%2FOrphan%20Clips%2F"
},
"loc:create-folder": {
"href": "https://CloudUX_Hostname/apis/avid.pam;version=2;;realm=REALM/locations/folders/%2FOrphan%20Clips%2F?offset=0&limit=25"
},
"loc:update-item": {
"href": "https://CloudUX_Hostname/apis/avid.pam;version=2;;realm=REALM/locations/items/%2FOrphan%20Clips%2F?offset=0&limit=25"
},
"loc:delete-item-in-folder-by-id-bulk-command": {
"href": "https://CloudUX_Hostname/apis/avid.pam;version=2;;realm=REALM/locations/folders/%2FOrphan%20Clips%2F/command/delete-items"
},
"loc:add-item": {
"href": "https://CloudUX_Hostname/apis/avid.pam;version=2;;realm=REALM/locations/operations/add/%2FOrphan%20Clips%2F"
},
"loc:move-item": {
"href": "https://CloudUX_Hostname/apis/avid.pam;version=2;;realm=REALM/locations/operations/move/%2FOrphan%20Clips%2F"
},
"loc:add-items": {
"href": "https://CloudUX_Hostname/apis/avid.pam;version=2;;realm=REALM/locations/operations/add-items/%2FOrphan%20Clips%2F"
},
"loc:move-items": {
"href": "https://CloudUX_Hostname/apis/avid.pam;version=2;;realm=REALM/locations/operations/move-items/%2FOrphan%20Clips%2F"
},
"pa:upload-file": {
"href": "https://CloudUX_Hostname/asset/pam/file/upload"
},
"pa:import-asset-command": {
"href": "https://CloudUX_Hostname/apis/avid.pam;version=2;;realm=REALM/locations/folders/%2FOrphan%20Clips%2F/command/import-asset"
},
"loc:path-to-root": {
"href": "https://CloudUX_Hostname/apis/avid.pam;version=2;;realm=REALM/locations/path/folder/%2FOrphan%20Clips%2F"
},
"loc:parent-folder": {
"href": "https://CloudUX_Hostname/apis/avid.pam;version=2;;realm=REALM/locations/folders/parent/%2FOrphan%20Clips%2F"
},
"loc:parent-collection": {
"href": "https://CloudUX_Hostname/apis/avid.pam;version=2;;realm=REALM/locations/folders/parent/collection/%2FOrphan%20Clips%2F"
},
"loc:collection-at-itemid": {
"href": "https://CloudUX_Hostname/apis/avid.pam;version=2;;realm=REALM/locations/folders/collection/%2FOrphan%20Clips%2F/at/{itemid}",
"templated": true
}
}
},
{
"base": {
"systemID": "systemID",
"systemType": "interplay-pam",
"id": "/Unchecked-in Avid Assets/",
"type": "localbin"
},
"common": {
"path": "/Unchecked-in Avid Assets/",
"creator": "Administrator",
"created": "2019-04-26T14:18:12.477Z",
"modifier": "Administrator",
"name": "Unchecked-in Avid Assets",
"modified": "2019-04-26T14:18:12.477Z"
},
"status": {},
"_links": {
"self": {
"href": "https://CloudUX_Hostname/apis/avid.pam;version=2;;realm=REALM/locations/folders/%2FUnchecked-in%20Avid%20Assets%2F?offset=0&limit=25"
},
"loc:collection": {
"href": "https://CloudUX_Hostname/apis/avid.pam;version=2;;realm=REALM/locations/folders/collection/%2FUnchecked-in%20Avid%20Assets%2F?offset=0&limit=25"
},
"loc:locations": {
"href": "https://CloudUX_Hostname/apis/avid.pam;version=2;;realm=REALM/locations"
},
"pa:reservations": {
"href": "https://CloudUX_Hostname/apis/avid.pam;version=2;;realm=REALM/locations/folders/reservations/%2FUnchecked-in%20Avid%20Assets%2F"
},
"loc:create-folder": {
"href": "https://CloudUX_Hostname/apis/avid.pam;version=2;;realm=REALM/locations/folders/%2FUnchecked-in%20Avid%20Assets%2F?offset=0&limit=25"
},
"loc:update-item": {
"href": "https://CloudUX_Hostname/apis/avid.pam;version=2;;realm=REALM/locations/items/%2FUnchecked-in%20Avid%20Assets%2F?offset=0&limit=25"
},
"loc:delete-item-in-folder-by-id-bulk-command": {
"href": "https://CloudUX_Hostname/apis/avid.pam;version=2;;realm=REALM/locations/folders/%2FUnchecked-in%20Avid%20Assets%2F/command/delete-items"
},
"loc:add-item": {
"href": "https://CloudUX_Hostname/apis/avid.pam;version=2;;realm=REALM/locations/operations/add/%2FUnchecked-in%20Avid%20Assets%2F"
},
"loc:move-item": {
"href": "https://CloudUX_Hostname/apis/avid.pam;version=2;;realm=REALM/locations/operations/move/%2FUnchecked-in%20Avid%20Assets%2F"
},
"loc:add-items": {
"href": "https://CloudUX_Hostname/apis/avid.pam;version=2;;realm=REALM/locations/operations/add-items/%2FUnchecked-in%20Avid%20Assets%2F"
},
"loc:move-items": {
"href": "https://CloudUX_Hostname/apis/avid.pam;version=2;;realm=REALM/locations/operations/move-items/%2FUnchecked-in%20Avid%20Assets%2F"
},
"pa:upload-file": {
"href": "https://CloudUX_Hostname/asset/pam/file/upload"
},
"pa:import-asset-command": {
"href": "https://CloudUX_Hostname/apis/avid.pam;version=2;;realm=REALM/locations/folders/%2FUnchecked-in%20Avid%20Assets%2F/command/import-asset"
},
"loc:path-to-root": {
"href": "https://CloudUX_Hostname/apis/avid.pam;version=2;;realm=REALM/locations/path/folder/%2FUnchecked-in%20Avid%20Assets%2F"
},
"loc:parent-folder": {
"href": "https://CloudUX_Hostname/apis/avid.pam;version=2;;realm=REALM/locations/folders/parent/%2FUnchecked-in%20Avid%20Assets%2F"
},
"loc:parent-collection": {
"href": "https://CloudUX_Hostname/apis/avid.pam;version=2;;realm=REALM/locations/folders/parent/collection/%2FUnchecked-in%20Avid%20Assets%2F"
},
"loc:collection-at-itemid": {
"href": "https://CloudUX_Hostname/apis/avid.pam;version=2;;realm=REALM/locations/folders/collection/%2FUnchecked-in%20Avid%20Assets%2F/at/{itemid}",
"templated": true
}
}
},
{
"base": {
"systemID": "systemID",
"systemType": "interplay-pam",
"id": "/Nearchive on NLT-NEARCHIVE/",
"type": "folder"
},
"common": {
"path": "/Nearchive on NLT-NEARCHIVE/",
"creator": "prcrt-wkgp1-7c5",
"created": "2020-10-27T16:44:07.046Z",
"modifier": "prcrt-wkgp1-7c5",
"name": "Nearchive on NLT-NEARCHIVE",
"modified": "2020-10-27T16:44:07.046Z"
},
"status": {},
"_links": {
"self": {
"href": "https://CloudUX_Hostname/apis/avid.pam;version=2;;realm=REALM/locations/folders/%2FNearchive%20on%20NLT-NEARCHIVE%2F?offset=0&limit=25"
},
"loc:collection": {
"href": "https://CloudUX_Hostname/apis/avid.pam;version=2;;realm=REALM/locations/folders/collection/%2FNearchive%20on%20NLT-NEARCHIVE%2F?offset=0&limit=25"
},
"loc:locations": {
"href": "https://CloudUX_Hostname/apis/avid.pam;version=2;;realm=REALM/locations"
},
"pa:reservations": {
"href": "https://CloudUX_Hostname/apis/avid.pam;version=2;;realm=REALM/locations/folders/reservations/%2FNearchive%20on%20NLT-NEARCHIVE%2F"
},
"loc:create-folder": {
"href": "https://CloudUX_Hostname/apis/avid.pam;version=2;;realm=REALM/locations/folders/%2FNearchive%20on%20NLT-NEARCHIVE%2F?offset=0&limit=25"
},
"loc:update-item": {
"href": "https://CloudUX_Hostname/apis/avid.pam;version=2;;realm=REALM/locations/items/%2FNearchive%20on%20NLT-NEARCHIVE%2F?offset=0&limit=25"
},
"loc:delete-item-in-folder-by-id-bulk-command": {
"href": "https://CloudUX_Hostname/apis/avid.pam;version=2;;realm=REALM/locations/folders/%2FNearchive%20on%20NLT-NEARCHIVE%2F/command/delete-items"
},
"loc:add-item": {
"href": "https://CloudUX_Hostname/apis/avid.pam;version=2;;realm=REALM/locations/operations/add/%2FNearchive%20on%20NLT-NEARCHIVE%2F"
},
"loc:move-item": {
"href": "https://CloudUX_Hostname/apis/avid.pam;version=2;;realm=REALM/locations/operations/move/%2FNearchive%20on%20NLT-NEARCHIVE%2F"
},
"loc:add-items": {
"href": "https://CloudUX_Hostname/apis/avid.pam;version=2;;realm=REALM/locations/operations/add-items/%2FNearchive%20on%20NLT-NEARCHIVE%2F"
},
"loc:move-items": {
"href": "https://CloudUX_Hostname/apis/avid.pam;version=2;;realm=REALM/locations/operations/move-items/%2FNearchive%20on%20NLT-NEARCHIVE%2F"
},
"pa:upload-file": {
"href": "https://CloudUX_Hostname/asset/pam/file/upload"
},
"pa:import-asset-command": {
"href": "https://CloudUX_Hostname/apis/avid.pam;version=2;;realm=REALM/locations/folders/%2FNearchive%20on%20NLT-NEARCHIVE%2F/command/import-asset"
},
"loc:path-to-root": {
"href": "https://CloudUX_Hostname/apis/avid.pam;version=2;;realm=REALM/locations/path/folder/%2FNearchive%20on%20NLT-NEARCHIVE%2F"
},
"loc:parent-folder": {
"href": "https://CloudUX_Hostname/apis/avid.pam;version=2;;realm=REALM/locations/folders/parent/%2FNearchive%20on%20NLT-NEARCHIVE%2F"
},
"loc:parent-collection": {
"href": "https://CloudUX_Hostname/apis/avid.pam;version=2;;realm=REALM/locations/folders/parent/collection/%2FNearchive%20on%20NLT-NEARCHIVE%2F"
},
"loc:collection-at-itemid": {
"href": "https://CloudUX_Hostname/apis/avid.pam;version=2;;realm=REALM/locations/folders/collection/%2FNearchive%20on%20NLT-NEARCHIVE%2F/at/{itemid}",
"templated": true
}
}
},
{
"base": {
"systemID": "systemID",
"systemType": "interplay-pam",
"id": "/Automated_tests_1623677877406/",
"type": "folder"
},
"common": {
"path": "/Automated_tests_1623677877406/",
"creator": "Administrator",
"created": "2021-06-14T13:37:57.79Z",
"modifier": "Administrator",
"name": "Automated_tests_1623677877406",
"modified": "1601-01-01T00:00:00Z"
},
"status": {},
"_links": {
"self": {
"href": "https://CloudUX_Hostname/apis/avid.pam;version=2;;realm=REALM/locations/folders/%2FAutomated_tests_1623677877406%2F?offset=0&limit=25"
},
"loc:collection": {
"href": "https://CloudUX_Hostname/apis/avid.pam;version=2;;realm=REALM/locations/folders/collection/%2FAutomated_tests_1623677877406%2F?offset=0&limit=25"
},
"loc:locations": {
"href": "https://CloudUX_Hostname/apis/avid.pam;version=2;;realm=REALM/locations"
},
"pa:reservations": {
"href": "https://CloudUX_Hostname/apis/avid.pam;version=2;;realm=REALM/locations/folders/reservations/%2FAutomated_tests_1623677877406%2F"
},
"loc:create-folder": {
"href": "https://CloudUX_Hostname/apis/avid.pam;version=2;;realm=REALM/locations/folders/%2FAutomated_tests_1623677877406%2F?offset=0&limit=25"
},
"loc:update-item": {
"href": "https://CloudUX_Hostname/apis/avid.pam;version=2;;realm=REALM/locations/items/%2FAutomated_tests_1623677877406%2F?offset=0&limit=25"
},
"loc:delete-item-in-folder-by-id-bulk-command": {
"href": "https://CloudUX_Hostname/apis/avid.pam;version=2;;realm=REALM/locations/folders/%2FAutomated_tests_1623677877406%2F/command/delete-items"
},
"loc:add-item": {
"href": "https://CloudUX_Hostname/apis/avid.pam;version=2;;realm=REALM/locations/operations/add/%2FAutomated_tests_1623677877406%2F"
},
"loc:move-item": {
"href": "https://CloudUX_Hostname/apis/avid.pam;version=2;;realm=REALM/locations/operations/move/%2FAutomated_tests_1623677877406%2F"
},
"loc:add-items": {
"href": "https://CloudUX_Hostname/apis/avid.pam;version=2;;realm=REALM/locations/operations/add-items/%2FAutomated_tests_1623677877406%2F"
},
"loc:move-items": {
"href": "https://CloudUX_Hostname/apis/avid.pam;version=2;;realm=REALM/locations/operations/move-items/%2FAutomated_tests_1623677877406%2F"
},
"pa:upload-file": {
"href": "https://CloudUX_Hostname/asset/pam/file/upload"
},
"pa:import-asset-command": {
"href": "https://CloudUX_Hostname/apis/avid.pam;version=2;;realm=REALM/locations/folders/%2FAutomated_tests_1623677877406%2F/command/import-asset"
},
"loc:path-to-root": {
"href": "https://CloudUX_Hostname/apis/avid.pam;version=2;;realm=REALM/locations/path/folder/%2FAutomated_tests_1623677877406%2F"
},
"loc:parent-folder": {
"href": "https://CloudUX_Hostname/apis/avid.pam;version=2;;realm=REALM/locations/folders/parent/%2FAutomated_tests_1623677877406%2F"
},
"loc:parent-collection": {
"href": "https://CloudUX_Hostname/apis/avid.pam;version=2;;realm=REALM/locations/folders/parent/collection/%2FAutomated_tests_1623677877406%2F"
},
"loc:collection-at-itemid": {
"href": "https://CloudUX_Hostname/apis/avid.pam;version=2;;realm=REALM/locations/folders/collection/%2FAutomated_tests_1623677877406%2F/at/{itemid}",
"templated": true
}
}
},
{
"base": {
"systemID": "systemID",
"systemType": "interplay-pam",
"id": "/Automated_tests_1623678113314/",
"type": "folder"
},
"common": {
"path": "/Automated_tests_1623678113314/",
"creator": "Administrator",
"created": "2021-06-14T13:41:53.687Z",
"modifier": "Administrator",
"name": "Automated_tests_1623678113314",
"modified": "1601-01-01T00:00:00Z"
},
"status": {},
"_links": {
"self": {
"href": "https://CloudUX_Hostname/apis/avid.pam;version=2;;realm=REALM/locations/folders/%2FAutomated_tests_1623678113314%2F?offset=0&limit=25"
},
"loc:collection": {
"href": "https://CloudUX_Hostname/apis/avid.pam;version=2;;realm=REALM/locations/folders/collection/%2FAutomated_tests_1623678113314%2F?offset=0&limit=25"
},
"loc:locations": {
"href": "https://CloudUX_Hostname/apis/avid.pam;version=2;;realm=REALM/locations"
},
"pa:reservations": {
"href": "https://CloudUX_Hostname/apis/avid.pam;version=2;;realm=REALM/locations/folders/reservations/%2FAutomated_tests_1623678113314%2F"
},
"loc:create-folder": {
"href": "https://CloudUX_Hostname/apis/avid.pam;version=2;;realm=REALM/locations/folders/%2FAutomated_tests_1623678113314%2F?offset=0&limit=25"
},
"loc:update-item": {
"href": "https://CloudUX_Hostname/apis/avid.pam;version=2;;realm=REALM/locations/items/%2FAutomated_tests_1623678113314%2F?offset=0&limit=25"
},
"loc:delete-item-in-folder-by-id-bulk-command": {
"href": "https://CloudUX_Hostname/apis/avid.pam;version=2;;realm=REALM/locations/folders/%2FAutomated_tests_1623678113314%2F/command/delete-items"
},
"loc:add-item": {
"href": "https://CloudUX_Hostname/apis/avid.pam;version=2;;realm=REALM/locations/operations/add/%2FAutomated_tests_1623678113314%2F"
},
"loc:move-item": {
"href": "https://CloudUX_Hostname/apis/avid.pam;version=2;;realm=REALM/locations/operations/move/%2FAutomated_tests_1623678113314%2F"
},
"loc:add-items": {
"href": "https://CloudUX_Hostname/apis/avid.pam;version=2;;realm=REALM/locations/operations/add-items/%2FAutomated_tests_1623678113314%2F"
},
"loc:move-items": {
"href": "https://CloudUX_Hostname/apis/avid.pam;version=2;;realm=REALM/locations/operations/move-items/%2FAutomated_tests_1623678113314%2F"
},
"pa:upload-file": {
"href": "https://CloudUX_Hostname/asset/pam/file/upload"
},
"pa:import-asset-command": {
"href": "https://CloudUX_Hostname/apis/avid.pam;version=2;;realm=REALM/locations/folders/%2FAutomated_tests_1623678113314%2F/command/import-asset"
},
"loc:path-to-root": {
"href": "https://CloudUX_Hostname/apis/avid.pam;version=2;;realm=REALM/locations/path/folder/%2FAutomated_tests_1623678113314%2F"
},
"loc:parent-folder": {
"href": "https://CloudUX_Hostname/apis/avid.pam;version=2;;realm=REALM/locations/folders/parent/%2FAutomated_tests_1623678113314%2F"
},
"loc:parent-collection": {
"href": "https://CloudUX_Hostname/apis/avid.pam;version=2;;realm=REALM/locations/folders/parent/collection/%2FAutomated_tests_1623678113314%2F"
},
"loc:collection-at-itemid": {
"href": "https://CloudUX_Hostname/apis/avid.pam;version=2;;realm=REALM/locations/folders/collection/%2FAutomated_tests_1623678113314%2F/at/{itemid}",
"templated": true
}
}
}
]
}
}
}
}
See more information about loc:root-item link relation: Link relation loc:root-item
Step 2
For this example we will list items in /Projects folder. From response above, you need a link under _embedded.loc:item._links.self for “/Projects” folder.
- Once you found the link make GET request to see items from "/Projects" folder.
- Use the token obtained earlier in: Authentication step. The access token should be added to the header of the request as Authorization parameter “Bearer access token“. Pay attention to token expiration time.
- An example response is showing below:
Response for Production management: list items in /Projects folder
{
"base": {
"systemID": "systemID",
"systemType": "interplay-pam",
"id": "/Projects/",
"type": "project"
},
"common": {
"path": "/Projects/",
"creator": "Administrator",
"created": "2019-04-26T14:18:12.385Z",
"modifier": "Administrator",
"name": "Projects",
"modified": "2019-04-26T14:18:12.385Z"
},
"status": {},
"_links": {
"self": {
"href": "https://CloudUX_Hostname/apis/avid.pam;version=2;realm=REALM/locations/folders/%2FProjects%2F?offset=0&limit=25"
},
"loc:collection": {
"href": "https://CloudUX_Hostname/apis/avid.pam;version=2;realm=REALM/locations/folders/collection/%2FProjects%2F?offset=0&limit=25"
},
"loc:locations": {
"href": "https://CloudUX_Hostname/apis/avid.pam;version=2;realm=REALM/locations"
},
"pa:reservations": {
"href": "https://CloudUX_Hostname/apis/avid.pam;version=2;realm=REALM/locations/folders/reservations/%2FProjects%2F"
},
"loc:create-folder": {
"href": "https://CloudUX_Hostname/apis/avid.pam;version=2;realm=REALM/locations/folders/%2FProjects%2F?offset=0&limit=25"
},
"loc:update-item": {
"href": "https://CloudUX_Hostname/apis/avid.pam;version=2;realm=REALM/locations/items/%2FProjects%2F?offset=0&limit=25"
},
"loc:delete-item-in-folder-by-id-bulk-command": {
"href": "https://CloudUX_Hostname/apis/avid.pam;version=2;realm=REALM/locations/folders/%2FProjects%2F/command/delete-items"
},
"loc:add-item": {
"href": "https://CloudUX_Hostname/apis/avid.pam;version=2;realm=REALM/locations/operations/add/%2FProjects%2F"
},
"loc:move-item": {
"href": "https://CloudUX_Hostname/apis/avid.pam;version=2;realm=REALM/locations/operations/move/%2FProjects%2F"
},
"loc:add-items": {
"href": "https://CloudUX_Hostname/apis/avid.pam;version=2;realm=REALM/locations/operations/add-items/%2FProjects%2F"
},
"loc:move-items": {
"href": "https://CloudUX_Hostname/apis/avid.pam;version=2;realm=REALM/locations/operations/move-items/%2FProjects%2F"
},
"pa:upload-file": {
"href": "https://CloudUX_Hostname/asset/pam/file/upload"
},
"pa:import-asset-command": {
"href": "https://CloudUX_Hostname/apis/avid.pam;version=2;realm=REALM/locations/folders/%2FProjects%2F/command/import-asset"
},
"loc:path-to-root": {
"href": "https://CloudUX_Hostname/apis/avid.pam;version=2;realm=REALM/locations/path/folder/%2FProjects%2F"
},
"loc:parent-folder": {
"href": "https://CloudUX_Hostname/apis/avid.pam;version=2;realm=REALM/locations/folders/parent/%2FProjects%2F"
},
"loc:parent-collection": {
"href": "https://CloudUX_Hostname/apis/avid.pam;version=2;realm=REALM/locations/folders/parent/collection/%2FProjects%2F"
},
"loc:collection-at-itemid": {
"href": "https://CloudUX_Hostname/apis/avid.pam;version=2;realm=REALM/locations/folders/collection/%2FProjects%2F/at/{itemid}",
"templated": true
},
"curies": [
{
"name": "loc",
"href": "http://developer.avid.com/ctms/api/loc/linkrels/{rel}.html",
"templated": true
},
{
"name": "aa",
"href": "http://developer.avid.com/ctms/api/aa/linkrels/{rel}.html",
"templated": true
},
{
"name": "pa",
"href": "http://developer.avid.com/ctms/api/pa/linkrels/{rel}.html",
"templated": true
}
]
},
"_embedded": {
"loc:collection": {
"paging": {
"limit": 25,
"offset": 0,
"elements": 5,
"totalElements": 5
},
"_links": {
"self": {
"href": "https://CloudUX_Hostname/apis/avid.pam;version=2;realm=REALM/locations/folders/collection/%2FProjects%2F?offset=0&limit=25"
},
"first": {
"href": "https://CloudUX_Hostname/apis/avid.pam;version=2;realm=REALM/locations/folders/collection/%2FProjects%2F?offset=0&limit=25"
},
"loc:locations": {
"href": "https://CloudUX_Hostname/apis/avid.pam;version=2;realm=REALM/locations"
},
"curies": [
{
"name": "loc",
"href": "http://developer.avid.com/ctms/api/loc/linkrels/{rel}.html",
"templated": true
},
{
"name": "aa",
"href": "http://developer.avid.com/ctms/api/aa/linkrels/{rel}.html",
"templated": true
},
{
"name": "pa",
"href": "http://developer.avid.com/ctms/api/pa/linkrels/{rel}.html",
"templated": true
}
],
"loc:item": [
{
"href": "https://CloudUX_Hostname/apis/avid.pam;version=2;realm=REALM/locations/folders/%2FProjects%2FNLTek%2F?offset=0&limit=25"
},
{
"href": "https://CloudUX_Hostname/apis/avid.pam;version=2;realm=REALM/locations/folders/%2FProjects%2FArchive%2F?offset=0&limit=25"
},
{
"href": "https://CloudUX_Hostname/apis/avid.pam;version=2;realm=REALM/locations/folders/%2FProjects%2FRestore%2F?offset=0&limit=25"
},
{
"href": "https://CloudUX_Hostname/apis/avid.pam;version=2;realm=REALM/locations/folders/%2FProjects%2Ftest_for_karate%2F?offset=0&limit=25"
},
{
"href": "https://CloudUX_Hostname/apis/avid.pam;version=2;realm=REALM/locations/items/%2FProjects%2F060a2b340101010101010f0013-000000-0d020f0045d400ea-060e2b347f7f-d080"
}
]
},
"_embedded": {
"loc:item": [
{
"base": {
"systemID": "systemID",
"systemType": "interplay-pam",
"id": "/Projects/NLTek/",
"type": "folder"
},
"common": {
"path": "/Projects/NLTek/",
"creator": "Administrator",
"created": "2019-04-26T15:11:49.677Z",
"modifier": "Administrator",
"name": "NLTek",
"modified": "2019-04-26T15:11:49.677Z"
},
"status": {},
"_links": {
"self": {
"href": "https://CloudUX_Hostname/apis/avid.pam;version=2;realm=REALM/locations/folders/%2FProjects%2FNLTek%2F?offset=0&limit=25"
},
"loc:collection": {
"href": "https://CloudUX_Hostname/apis/avid.pam;version=2;realm=REALM/locations/folders/collection/%2FProjects%2FNLTek%2F?offset=0&limit=25"
},
"loc:locations": {
"href": "https://CloudUX_Hostname/apis/avid.pam;version=2;realm=REALM/locations"
},
"pa:reservations": {
"href": "https://CloudUX_Hostname/apis/avid.pam;version=2;realm=REALM/locations/folders/reservations/%2FProjects%2FNLTek%2F"
},
"loc:create-folder": {
"href": "https://CloudUX_Hostname/apis/avid.pam;version=2;realm=REALM/locations/folders/%2FProjects%2FNLTek%2F?offset=0&limit=25"
},
"loc:update-item": {
"href": "https://CloudUX_Hostname/apis/avid.pam;version=2;realm=REALM/locations/items/%2FProjects%2FNLTek%2F?offset=0&limit=25"
},
"loc:delete-item-in-folder-by-id-bulk-command": {
"href": "https://CloudUX_Hostname/apis/avid.pam;version=2;realm=REALM/locations/folders/%2FProjects%2FNLTek%2F/command/delete-items"
},
"loc:add-item": {
"href": "https://CloudUX_Hostname/apis/avid.pam;version=2;realm=REALM/locations/operations/add/%2FProjects%2FNLTek%2F"
},
"loc:move-item": {
"href": "https://CloudUX_Hostname/apis/avid.pam;version=2;realm=REALM/locations/operations/move/%2FProjects%2FNLTek%2F"
},
"loc:add-items": {
"href": "https://CloudUX_Hostname/apis/avid.pam;version=2;realm=REALM/locations/operations/add-items/%2FProjects%2FNLTek%2F"
},
"loc:move-items": {
"href": "https://CloudUX_Hostname/apis/avid.pam;version=2;realm=REALM/locations/operations/move-items/%2FProjects%2FNLTek%2F"
},
"pa:upload-file": {
"href": "https://CloudUX_Hostname/asset/pam/file/upload"
},
"pa:import-asset-command": {
"href": "https://CloudUX_Hostname/apis/avid.pam;version=2;realm=REALM/locations/folders/%2FProjects%2FNLTek%2F/command/import-asset"
},
"loc:path-to-root": {
"href": "https://CloudUX_Hostname/apis/avid.pam;version=2;realm=REALM/locations/path/folder/%2FProjects%2FNLTek%2F"
},
"loc:parent-folder": {
"href": "https://CloudUX_Hostname/apis/avid.pam;version=2;realm=REALM/locations/folders/parent/%2FProjects%2FNLTek%2F"
},
"loc:parent-collection": {
"href": "https://CloudUX_Hostname/apis/avid.pam;version=2;realm=REALM/locations/folders/parent/collection/%2FProjects%2FNLTek%2F"
},
"loc:collection-at-itemid": {
"href": "https://CloudUX_Hostname/apis/avid.pam;version=2;realm=REALM/locations/folders/collection/%2FProjects%2FNLTek%2F/at/{itemid}",
"templated": true
}
}
},
{
"base": {
"systemID": "systemID",
"systemType": "interplay-pam",
"id": "/Projects/Archive/",
"type": "folder"
},
"common": {
"path": "/Projects/Archive/",
"creator": "Administrator",
"created": "2019-04-26T18:37:03.778Z",
"modifier": "Administrator",
"name": "Archive",
"modified": "2019-04-26T18:37:03.778Z"
},
"status": {},
"_links": {
"self": {
"href": "https://CloudUX_Hostname/apis/avid.pam;version=2;realm=REALM/locations/folders/%2FProjects%2FArchive%2F?offset=0&limit=25"
},
"loc:collection": {
"href": "https://CloudUX_Hostname/apis/avid.pam;version=2;realm=REALM/locations/folders/collection/%2FProjects%2FArchive%2F?offset=0&limit=25"
},
"loc:locations": {
"href": "https://CloudUX_Hostname/apis/avid.pam;version=2;realm=REALM/locations"
},
"pa:reservations": {
"href": "https://CloudUX_Hostname/apis/avid.pam;version=2;realm=REALM/locations/folders/reservations/%2FProjects%2FArchive%2F"
},
"loc:create-folder": {
"href": "https://CloudUX_Hostname/apis/avid.pam;version=2;realm=REALM/locations/folders/%2FProjects%2FArchive%2F?offset=0&limit=25"
},
"loc:update-item": {
"href": "https://CloudUX_Hostname/apis/avid.pam;version=2;realm=REALM/locations/items/%2FProjects%2FArchive%2F?offset=0&limit=25"
},
"loc:delete-item-in-folder-by-id-bulk-command": {
"href": "https://CloudUX_Hostname/apis/avid.pam;version=2;realm=REALM/locations/folders/%2FProjects%2FArchive%2F/command/delete-items"
},
"loc:add-item": {
"href": "https://CloudUX_Hostname/apis/avid.pam;version=2;realm=REALM/locations/operations/add/%2FProjects%2FArchive%2F"
},
"loc:move-item": {
"href": "https://CloudUX_Hostname/apis/avid.pam;version=2;realm=REALM/locations/operations/move/%2FProjects%2FArchive%2F"
},
"loc:add-items": {
"href": "https://CloudUX_Hostname/apis/avid.pam;version=2;realm=REALM/locations/operations/add-items/%2FProjects%2FArchive%2F"
},
"loc:move-items": {
"href": "https://CloudUX_Hostname/apis/avid.pam;version=2;realm=REALM/locations/operations/move-items/%2FProjects%2FArchive%2F"
},
"pa:upload-file": {
"href": "https://CloudUX_Hostname/asset/pam/file/upload"
},
"pa:import-asset-command": {
"href": "https://CloudUX_Hostname/apis/avid.pam;version=2;realm=REALM/locations/folders/%2FProjects%2FArchive%2F/command/import-asset"
},
"loc:path-to-root": {
"href": "https://CloudUX_Hostname/apis/avid.pam;version=2;realm=REALM/locations/path/folder/%2FProjects%2FArchive%2F"
},
"loc:parent-folder": {
"href": "https://CloudUX_Hostname/apis/avid.pam;version=2;realm=REALM/locations/folders/parent/%2FProjects%2FArchive%2F"
},
"loc:parent-collection": {
"href": "https://CloudUX_Hostname/apis/avid.pam;version=2;realm=REALM/locations/folders/parent/collection/%2FProjects%2FArchive%2F"
},
"loc:collection-at-itemid": {
"href": "https://CloudUX_Hostname/apis/avid.pam;version=2;realm=REALM/locations/folders/collection/%2FProjects%2FArchive%2F/at/{itemid}",
"templated": true
}
}
},
{
"base": {
"systemID": "systemID",
"systemType": "interplay-pam",
"id": "/Projects/Restore/",
"type": "folder"
},
"common": {
"path": "/Projects/Restore/",
"creator": "prcrt-wkgp1-7c8",
"created": "2019-05-16T15:09:03.495Z",
"modifier": "prcrt-wkgp1-7c8",
"name": "Restore",
"modified": "2019-05-16T15:09:03.495Z"
},
"status": {},
"_links": {
"self": {
"href": "https://CloudUX_Hostname/apis/avid.pam;version=2;realm=REALM/locations/folders/%2FProjects%2FRestore%2F?offset=0&limit=25"
},
"loc:collection": {
"href": "https://CloudUX_Hostname/apis/avid.pam;version=2;realm=REALM/locations/folders/collection/%2FProjects%2FRestore%2F?offset=0&limit=25"
},
"loc:locations": {
"href": "https://CloudUX_Hostname/apis/avid.pam;version=2;realm=REALM/locations"
},
"pa:reservations": {
"href": "https://CloudUX_Hostname/apis/avid.pam;version=2;realm=REALM/locations/folders/reservations/%2FProjects%2FRestore%2F"
},
"loc:create-folder": {
"href": "https://CloudUX_Hostname/apis/avid.pam;version=2;realm=REALM/locations/folders/%2FProjects%2FRestore%2F?offset=0&limit=25"
},
"loc:update-item": {
"href": "https://CloudUX_Hostname/apis/avid.pam;version=2;realm=REALM/locations/items/%2FProjects%2FRestore%2F?offset=0&limit=25"
},
"loc:delete-item-in-folder-by-id-bulk-command": {
"href": "https://CloudUX_Hostname/apis/avid.pam;version=2;realm=REALM/locations/folders/%2FProjects%2FRestore%2F/command/delete-items"
},
"loc:add-item": {
"href": "https://CloudUX_Hostname/apis/avid.pam;version=2;realm=REALM/locations/operations/add/%2FProjects%2FRestore%2F"
},
"loc:move-item": {
"href": "https://CloudUX_Hostname/apis/avid.pam;version=2;realm=REALM/locations/operations/move/%2FProjects%2FRestore%2F"
},
"loc:add-items": {
"href": "https://CloudUX_Hostname/apis/avid.pam;version=2;realm=REALM/locations/operations/add-items/%2FProjects%2FRestore%2F"
},
"loc:move-items": {
"href": "https://CloudUX_Hostname/apis/avid.pam;version=2;realm=REALM/locations/operations/move-items/%2FProjects%2FRestore%2F"
},
"pa:upload-file": {
"href": "https://CloudUX_Hostname/asset/pam/file/upload"
},
"pa:import-asset-command": {
"href": "https://CloudUX_Hostname/apis/avid.pam;version=2;realm=REALM/locations/folders/%2FProjects%2FRestore%2F/command/import-asset"
},
"loc:path-to-root": {
"href": "https://CloudUX_Hostname/apis/avid.pam;version=2;realm=REALM/locations/path/folder/%2FProjects%2FRestore%2F"
},
"loc:parent-folder": {
"href": "https://CloudUX_Hostname/apis/avid.pam;version=2;realm=REALM/locations/folders/parent/%2FProjects%2FRestore%2F"
},
"loc:parent-collection": {
"href": "https://CloudUX_Hostname/apis/avid.pam;version=2;realm=REALM/locations/folders/parent/collection/%2FProjects%2FRestore%2F"
},
"loc:collection-at-itemid": {
"href": "https://CloudUX_Hostname/apis/avid.pam;version=2;realm=REALM/locations/folders/collection/%2FProjects%2FRestore%2F/at/{itemid}",
"templated": true
}
}
},
{
"base": {
"systemID": "systemID",
"systemType": "interplay-pam",
"id": "/Projects/test_for_karate/",
"type": "folder"
},
"common": {
"path": "/Projects/test_for_karate/",
"creator": "Administrator",
"created": "2020-06-18T05:33:11.575Z",
"modifier": "Administrator",
"name": "test_for_karate",
"modified": "2020-06-18T05:33:11.575Z"
},
"status": {},
"_links": {
"self": {
"href": "https://CloudUX_Hostname/apis/avid.pam;version=2;realm=REALM/locations/folders/%2FProjects%2Ftest_for_karate%2F?offset=0&limit=25"
},
"loc:collection": {
"href": "https://CloudUX_Hostname/apis/avid.pam;version=2;realm=REALM/locations/folders/collection/%2FProjects%2Ftest_for_karate%2F?offset=0&limit=25"
},
"loc:locations": {
"href": "https://CloudUX_Hostname/apis/avid.pam;version=2;realm=REALM/locations"
},
"pa:reservations": {
"href": "https://CloudUX_Hostname/apis/avid.pam;version=2;realm=REALM/locations/folders/reservations/%2FProjects%2Ftest_for_karate%2F"
},
"loc:create-folder": {
"href": "https://CloudUX_Hostname/apis/avid.pam;version=2;realm=REALM/locations/folders/%2FProjects%2Ftest_for_karate%2F?offset=0&limit=25"
},
"loc:update-item": {
"href": "https://CloudUX_Hostname/apis/avid.pam;version=2;realm=REALM/locations/items/%2FProjects%2Ftest_for_karate%2F?offset=0&limit=25"
},
"loc:delete-item-in-folder-by-id-bulk-command": {
"href": "https://CloudUX_Hostname/apis/avid.pam;version=2;realm=REALM/locations/folders/%2FProjects%2Ftest_for_karate%2F/command/delete-items"
},
"loc:add-item": {
"href": "https://CloudUX_Hostname/apis/avid.pam;version=2;realm=REALM/locations/operations/add/%2FProjects%2Ftest_for_karate%2F"
},
"loc:move-item": {
"href": "https://CloudUX_Hostname/apis/avid.pam;version=2;realm=REALM/locations/operations/move/%2FProjects%2Ftest_for_karate%2F"
},
"loc:add-items": {
"href": "https://CloudUX_Hostname/apis/avid.pam;version=2;realm=REALM/locations/operations/add-items/%2FProjects%2Ftest_for_karate%2F"
},
"loc:move-items": {
"href": "https://CloudUX_Hostname/apis/avid.pam;version=2;realm=REALM/locations/operations/move-items/%2FProjects%2Ftest_for_karate%2F"
},
"pa:upload-file": {
"href": "https://CloudUX_Hostname/asset/pam/file/upload"
},
"pa:import-asset-command": {
"href": "https://CloudUX_Hostname/apis/avid.pam;version=2;realm=REALM/locations/folders/%2FProjects%2Ftest_for_karate%2F/command/import-asset"
},
"loc:path-to-root": {
"href": "https://CloudUX_Hostname/apis/avid.pam;version=2;realm=REALM/locations/path/folder/%2FProjects%2Ftest_for_karate%2F"
},
"loc:parent-folder": {
"href": "https://CloudUX_Hostname/apis/avid.pam;version=2;realm=REALM/locations/folders/parent/%2FProjects%2Ftest_for_karate%2F"
},
"loc:parent-collection": {
"href": "https://CloudUX_Hostname/apis/avid.pam;version=2;realm=REALM/locations/folders/parent/collection/%2FProjects%2Ftest_for_karate%2F"
},
"loc:collection-at-itemid": {
"href": "https://CloudUX_Hostname/apis/avid.pam;version=2;realm=REALM/locations/folders/collection/%2FProjects%2Ftest_for_karate%2F/at/{itemid}",
"templated": true
}
}
},
{
"base": {
"systemID": "systemID",
"systemType": "interplay-pam",
"id": "/Projects/060a2b340101010101010f0013-000000-0d020f0045d400ea-060e2b347f7f-d080",
"type": "folder-item"
},
"common": {
"creator": "Administrator",
"durationTC": "00:01:19:12",
"created": "2021-06-16T13:02:15Z",
"modifier": "Administrator",
"endTC": "00:01:19:12",
"assetTypeLabel": "Sequence",
"assetType": "sequence",
"path": "/Projects/",
"editRate": "25/1",
"name": "New.Sequence",
"dropframe": false,
"modified": "2021-06-16T13:03:28Z",
"startTC": "00:00:00:00"
},
"status": {
"media-status": "online"
},
"_links": {
"self": {
"href": "https://CloudUX_Hostname/apis/avid.pam;version=2;realm=REALM/locations/items/%2FProjects%2F060a2b340101010101010f0013-000000-0d020f0045d400ea-060e2b347f7f-d080"
},
"loc:referenced-object": {
"href": "https://CloudUX_Hostname/apis/avid.pam;version=2;realm=REALM/assets/060a2b340101010101010f0013-000000-0d020f0045d400ea-060e2b347f7f-d080"
},
"loc:path-to-root": {
"href": "https://CloudUX_Hostname/apis/avid.pam;version=2;realm=REALM/locations/path/folder/%2FProjects%2F060a2b340101010101010f0013-000000-0d020f0045d400ea-060e2b347f7f-d080"
},
"loc:update-item": {
"href": "https://CloudUX_Hostname/apis/avid.pam;version=2;realm=REALM/locations/items/%2FProjects%2F060a2b340101010101010f0013-000000-0d020f0045d400ea-060e2b347f7f-d080"
},
"loc:delete-item": {
"href": "https://CloudUX_Hostname/apis/avid.pam;version=2;realm=REALM/locations/operations/delete/%2FProjects%2F060a2b340101010101010f0013-000000-0d020f0045d400ea-060e2b347f7f-d080"
},
"loc:export-item-command": {
"href": "https://CloudUX_Hostname/apis/avid.pam;version=2;realm=REALM/locations/items/%2FProjects%2F060a2b340101010101010f0013-000000-0d020f0045d400ea-060e2b347f7f-d080/command/export-item"
},
"loc:parent-folder": {
"href": "https://CloudUX_Hostname/apis/avid.pam;version=2;realm=REALM/locations/items/parent/%2FProjects%2F060a2b340101010101010f0013-000000-0d020f0045d400ea-060e2b347f7f-d080"
},
"loc:parent-collection": {
"href": "https://CloudUX_Hostname/apis/avid.pam;version=2;realm=REALM/locations/items/parent/collection/%2FProjects%2F060a2b340101010101010f0013-000000-0d020f0045d400ea-060e2b347f7f-d080"
},
"loc:locations": {
"href": "https://CloudUX_Hostname/apis/avid.pam;version=2;realm=REALM/locations"
},
"curies": [
{
"name": "loc",
"href": "http://developer.avid.com/ctms/api/loc/linkrels/{rel}.html",
"templated": true
},
{
"name": "aa",
"href": "http://developer.avid.com/ctms/api/aa/linkrels/{rel}.html",
"templated": true
},
{
"name": "pa",
"href": "http://developer.avid.com/ctms/api/pa/linkrels/{rel}.html",
"templated": true
}
]
},
"_embedded": {
"loc:referenced-object": {
"base": {
"systemID": "systemID",
"systemType": "interplay-pam",
"id": "060a2b340101010101010f0013-000000-0d020f0045d400ea-060e2b347f7f-d080",
"type": "sequence"
},
"common": {
"creator": "Administrator",
"durationTC": "00:01:19:12",
"created": "2021-06-16T13:02:15Z",
"editRate": "25/1",
"modifier": "Administrator",
"endTC": "00:01:19:12",
"name": "New.Sequence",
"dropframe": false,
"modified": "2021-06-16T13:03:28Z",
"startTC": "00:00:00:00",
"assetTypeLabel": "Sequence",
"assetType": "sequence"
},
"status": {
"media-status": "online"
},
"_links": {
"self": {
"href": "https://CloudUX_Hostname/apis/avid.pam;version=2;realm=REALM/assets/060a2b340101010101010f0013-000000-0d020f0045d400ea-060e2b347f7f-d080"
},
"aa:asset": {
"href": "https://CloudUX_Hostname/apis/avid.pam;version=2;realm=REALM/assets/060a2b340101010101010f0013-000000-0d020f0045d400ea-060e2b347f7f-d080"
},
"aa:assets": {
"href": "https://CloudUX_Hostname/apis/avid.pam;version=2;realm=REALM/assets"
},
"pa:asset-relatives": {
"href": "https://CloudUX_Hostname/apis/avid.pam;version=2;realm=REALM/assets/060a2b340101010101010f0013-000000-0d020f0045d400ea-060e2b347f7f-d080/relatives"
},
"relations:relations": {
"href": "https://CloudUX_Hostname/apis/avid.pam;version=2;realm=REALM/assets/060a2b340101010101010f0013-000000-0d020f0045d400ea-060e2b347f7f-d080/relations"
},
"relations:relation-types": {
"href": "https://CloudUX_Hostname/apis/avid.pam;version=2;realm=REALM/assets/060a2b340101010101010f0013-000000-0d020f0045d400ea-060e2b347f7f-d080/relation-types"
},
"aa:thumb": {
"href": "https://CloudUX_Hostname/apis/avid.pam;version=2;realm=REALM/assets/060a2b340101010101010f0013-000000-0d020f0045d400ea-060e2b347f7f-d080/thumbs"
},
"aa:attributes": {
"href": "https://CloudUX_Hostname/apis/avid.pam;version=2;realm=REALM/assets/060a2b340101010101010f0013-000000-0d020f0045d400ea-060e2b347f7f-d080/attributes"
},
"pa:asset-associations": {
"href": "https://CloudUX_Hostname/apis/avid.pam;version=2;realm=REALM/assets/060a2b340101010101010f0013-000000-0d020f0045d400ea-060e2b347f7f-d080/associations"
},
"aa:time-based": {
"href": "https://CloudUX_Hostname/apis/avid.pam;version=2;realm=REALM/assets/060a2b340101010101010f0013-000000-0d020f0045d400ea-060e2b347f7f-d080/time-based"
},
"aa:update-time-based": {
"href": "https://CloudUX_Hostname/apis/avid.pam;version=2;realm=REALM/assets/060a2b340101010101010f0013-000000-0d020f0045d400ea-060e2b347f7f-d080/time-based"
},
"aa:delete-time-based": {
"href": "https://CloudUX_Hostname/apis/avid.pam;version=2;realm=REALM/assets/060a2b340101010101010f0013-000000-0d020f0045d400ea-060e2b347f7f-d080/time-based"
},
"aa:update-asset": {
"href": "https://CloudUX_Hostname/apis/avid.pam;version=2;realm=REALM/assets/060a2b340101010101010f0013-000000-0d020f0045d400ea-060e2b347f7f-d080",
"type": "application/hal+json"
},
"aa:update-attributes": {
"href": "https://CloudUX_Hostname/apis/avid.pam;version=2;realm=REALM/assets/060a2b340101010101010f0013-000000-0d020f0045d400ea-060e2b347f7f-d080/attributes",
"type": "application/hal+json"
},
"aa:access-by-type-usage-by-protocol": {
"href": "https://CloudUX_Hostname/apis/avid.pam;version=2;realm=REALM/assets/060a2b340101010101010f0013-000000-0d020f0045d400ea-060e2b347f7f-d080/access-files{?filetype,usage,protocol}",
"templated": true
},
"loc:referencing-items": {
"href": "https://CloudUX_Hostname/apis/avid.pam;version=2;realm=REALM/assets/060a2b340101010101010f0013-000000-0d020f0045d400ea-060e2b347f7f-d080/ref"
},
"datamodel:asset-model": {
"href": "https://CloudUX_Hostname/apis/avid.pam;version=2;realm=REALM/asset-model/060a2b340101010101010f0013-000000-0d020f0045d400ea-060e2b347f7f-d080"
},
"aa:export-asset-command": {
"href": "https://CloudUX_Hostname/apis/avid.pam;version=2;realm=REALM/assets/operations/export/060a2b340101010101010f0013-000000-0d020f0045d400ea-060e2b347f7f-d080"
},
"aa:file-package": {
"href": "https://CloudUX_Hostname/apis/avid.pam;version=2;realm=REALM/assets/060a2b340101010101010f0013-000000-0d020f0045d400ea-060e2b347f7f-d080/fileinfo/package/"
},
"aa:set-thumb-command": {
"href": "https://CloudUX_Hostname/apis/avid.pam;version=2;realm=REALM/assets/060a2b340101010101010f0013-000000-0d020f0045d400ea-060e2b347f7f-d080/command/set-thumb"
}
}
}
}
}
]
}
}
}
}
See more information about loc:item resource: Resource loc:item
See more information about loc:item-by-id link relation: Link relation loc:item-by-id
Create folder inside folder item
CloudUX has loc:create-folder link relation for folder in loc:item resource. This allows you to add a new folder to the folder item.
To create folder you need to use response from the step above: List items in folder
- Once you get response for the link with relation
loc:item-by-idorloc:root-itemyou can create a new folder. - Find link with relation
loc:create-folder. - Click on the link and make POST request to add folder to the folder item.
For example, from the response above you can add a new folder item to "/Projects". - In the request body put a JSON object with the name of your new folder item:
{ "common": { "name": "test_folder" } } - Use the token obtained earlier in: Authentication step. The access token should be added to the header of the request as Authorization parameter “Bearer access token“. Pay attention to token expiration time.
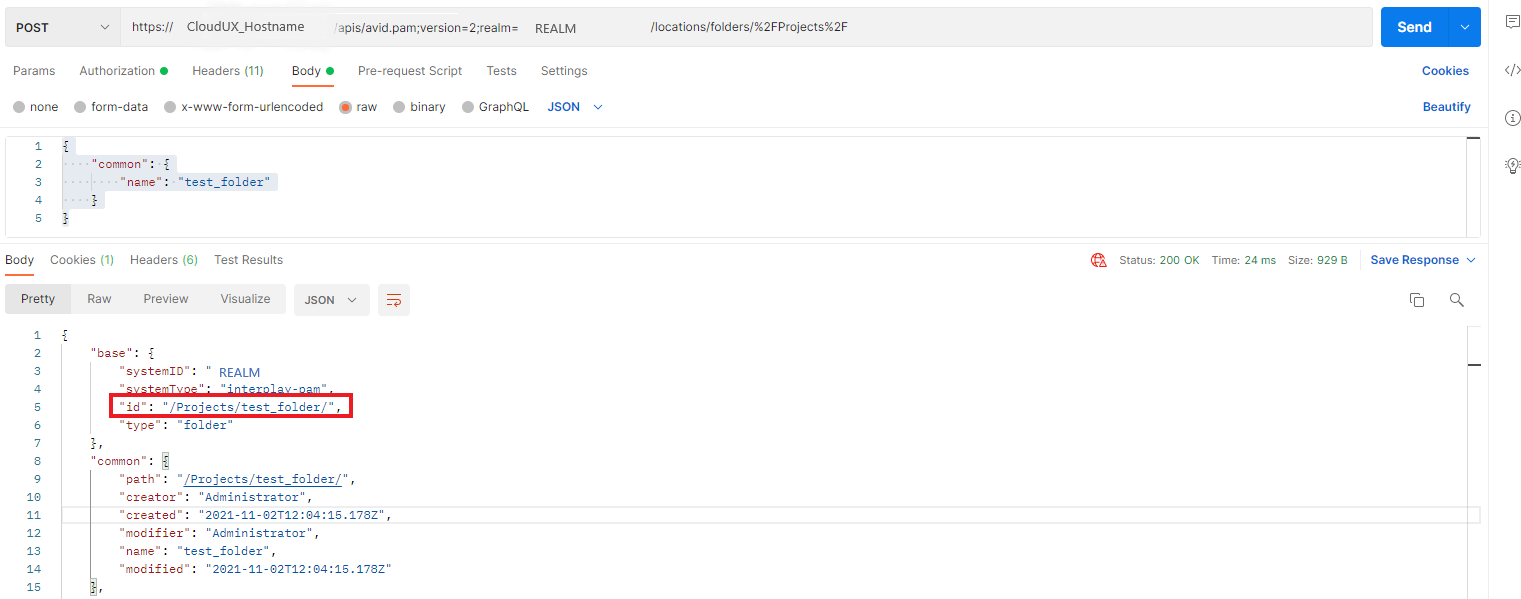
- An example response is showing below:
Response for Production Management: create folder in /Projects folder
{
    "base": {
        "systemID": "System_ID",
        "systemType": "interplay-pam",

        "id": "/Projects/test_folder/",

        "type": "folder"
    },
    "common": {

        "path": "/Projects/test_folder/",

        "creator": "Administrator",
        "created": "2021-11-02T12:04:15.178Z",
        "modifier": "Administrator",
        "name": "test_folder",
        "modified": "2021-11-02T12:04:15.178Z"
    },
    "status": {},
    "_links": {
        "self": {
            "href": "https://CloudUX_Hostname/apis/avid.pam;version=2;realm=REALM/locations/folders/%2FProjects%2Ftest_folder%2F?offset=0&limit=25"
        },
        "loc:collection": {
            "href": "https://CloudUX_Hostname/apis/avid.pam;version=2;realm=REALM/locations/folders/collection/%2FProjects%2Ftest_folder%2F?offset=0&limit=25"
        },
        "loc:locations": {
            "href": "https://CloudUX_Hostname/apis/avid.pam;version=2;realm=REALM/locations"
        },
        "pa:reservations": {
            "href": "https://CloudUX_Hostname/apis/avid.pam;version=2;realm=REALM/locations/folders/reservations/%2FProjects%2Ftest_folder%2F"
        },
        "loc:create-folder": {
            "href": "https://CloudUX_Hostname/apis/avid.pam;version=2;realm=REALM/locations/folders/%2FProjects%2Ftest_folder%2F?offset=0&limit=25"
        },
        "loc:update-item": {
            "href": "https://CloudUX_Hostname/apis/avid.pam;version=2;realm=REALM/locations/items/%2FProjects%2Ftest_folder%2F?offset=0&limit=25"
        },
        "loc:delete-item-in-folder-by-id-bulk-command": {
            "href": "https://CloudUX_Hostname/apis/avid.pam;version=2;realm=REALM/locations/folders/%2FProjects%2Ftest_folder%2F/command/delete-items"
        },
        "loc:add-item": {
            "href": "https://CloudUX_Hostname/apis/avid.pam;version=2;realm=REALM/locations/operations/add/%2FProjects%2Ftest_folder%2F"
        },
        "loc:move-item": {
            "href": "https://CloudUX_Hostname/apis/avid.pam;version=2;realm=REALM/locations/operations/move/%2FProjects%2Ftest_folder%2F"
        },
        "loc:add-items": {
            "href": "https://CloudUX_Hostname/apis/avid.pam;version=2;realm=REALM/locations/operations/add-items/%2FProjects%2Ftest_folder%2F"
        },
        "loc:move-items": {
            "href": "https://CloudUX_Hostname/apis/avid.pam;version=2;realm=REALM/locations/operations/move-items/%2FProjects%2Ftest_folder%2F"
        },
        "pa:upload-file": {
            "href": "https://CloudUX_Hostname/asset/pam/file/upload"
        },
        "pa:import-asset-command": {
            "href": "https://CloudUX_Hostname/apis/avid.pam;version=2;realm=REALM/locations/folders/%2FProjects%2Ftest_folder%2F/command/import-asset"
        },
        "loc:path-to-root": {
            "href": "https://CloudUX_Hostname/apis/avid.pam;version=2;realm=REALM/locations/path/folder/%2FProjects%2Ftest_folder%2F"
        },
        "loc:parent-folder": {
            "href": "https://CloudUX_Hostname/apis/avid.pam;version=2;realm=REALM/locations/folders/parent/%2FProjects%2Ftest_folder%2F"
        },
        "loc:parent-collection": {
            "href": "https://CloudUX_Hostname/apis/avid.pam;version=2;realm=REALM/locations/folders/parent/collection/%2FProjects%2Ftest_folder%2F"
        },
        "loc:collection-at-itemid": {
            "href": "https://CloudUX_Hostname/apis/avid.pam;version=2;realm=REALM/locations/folders/collection/%2FProjects%2Ftest_folder%2F/at/{itemid}",
            "templated": true
        },
        "curies": [
            {
                "name": "loc",
                "href": "http://developer.avid.com/ctms/api/loc/linkrels/{rel}.html",
                "templated": true
            },
            {
                "name": "aa",
                "href": "http://developer.avid.com/ctms/api/aa/linkrels/{rel}.html",
                "templated": true
            },
            {
                "name": "pa",
                "href": "http://developer.avid.com/ctms/api/pa/linkrels/{rel}.html",
                "templated": true
            }
        ]
    },
    "_embedded": {
        "loc:collection": {
            "paging": {
                "limit": 25,
                "offset": 0,
                "elements": 0,
                "totalElements": 3
            },
            "_links": {
                "self": {
                    "href": "https://CloudUX_Hostname/apis/avid.pam;version=2;realm=REALM/locations/folders/collection/%2FProjects%2Ftest_folder%2F?offset=0&limit=25"
                },
                "first": {
                    "href": "https://CloudUX_Hostname/apis/avid.pam;version=2;realm=REALM/locations/folders/collection/%2FProjects%2Ftest_folder%2F?offset=0&limit=25"
                },
                "loc:locations": {
                    "href": "https://CloudUX_Hostname/apis/avid.pam;version=2;realm=REALM/locations"
                },
                "curies": [
                    {
                        "name": "loc",
                        "href": "http://developer.avid.com/ctms/api/loc/linkrels/{rel}.html",
                        "templated": true
                    },
                    {
                        "name": "aa",
                        "href": "http://developer.avid.com/ctms/api/aa/linkrels/{rel}.html",
                        "templated": true
                    },
                    {
                        "name": "pa",
                        "href": "http://developer.avid.com/ctms/api/pa/linkrels/{rel}.html",
                        "templated": true
                    }
                ]
            }
        }
    }
}
See more information about loc:item resource: Resource loc:item
See more information about loc:create-folder link relation: Link relation loc:create-folder
Asset by id
To get the information about an asset, including the common attributes you can do the following requests.
To list items in the root folder you need to use response from the step above: Enumerate all available systems
- Once you get response for the link with relation
registry:servicerootsyou are ready to get information about asset by specific id. - Find link with relation
aa:asset-by-idand fill templated parameter with id of the asset. - Click on the link and make GET request to get asset by id.
- Use the token obtained earlier in: Authentication step. The access token should be added to the header of the request as Authorization parameter “Bearer access token“. Pay attention to token expiration time.
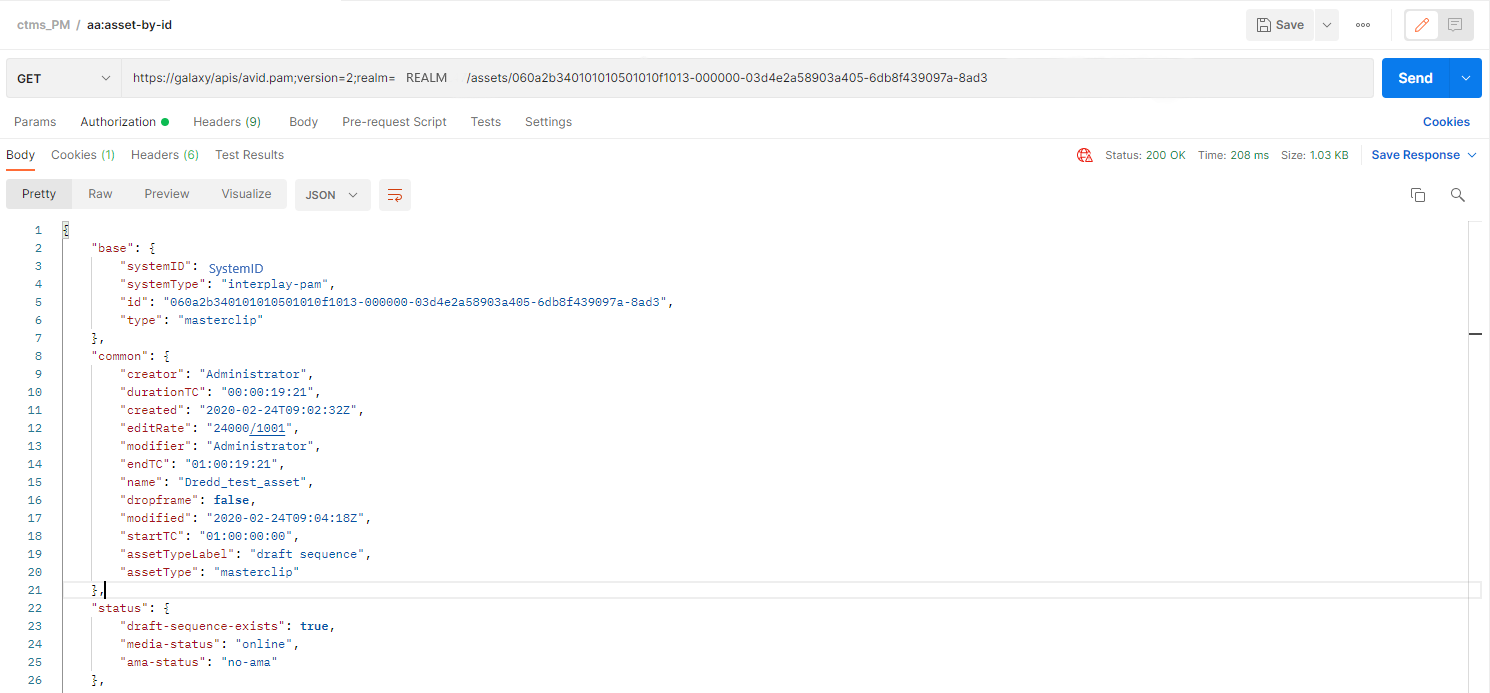
- An example response is showing below:
Response for Production Management: asset by id
{
    "base": {
        "systemID": "SystemID",
        "systemType": "interplay-pam",
        "id": "060a2b340101010501010f1013-000000-03d4e2a58903a405-6db8f439097a-8ad3",
        "type": "masterclip"
    },

    "common": {
        "creator": "Administrator",
        "durationTC": "00:00:19:21",
        "created": "2020-02-24T09:02:32Z",
        "editRate": "24000/1001",
        "modifier": "Administrator",
        "endTC": "01:00:19:21",
        "name": "Dredd_test_asset",
        "dropframe": false,
        "modified": "2020-02-24T09:04:18Z",
        "startTC": "01:00:00:00",
        "assetTypeLabel": "draft sequence",
        "assetType": "masterclip"
    },
    "status": {
        "draft-sequence-exists": true,
        "media-status": "online",
        "ama-status": "no-ama"
    },

    "_links": {
        "self": {
            "href": "https://CloudUX_Hostname/apis/avid.pam;version=2;realm=REALM/assets/060a2b340101010501010f1013-000000-03d4e2a58903a405-6db8f439097a-8ad3"
        },
        "aa:assets": {
            "href": "https://CloudUX_Hostname/apis/avid.pam;version=2;realm=REALM/assets"
        },
        "pa:asset-relatives": {
            "href": "https://CloudUX_Hostname/apis/avid.pam;version=2;realm=REALM/assets/060a2b340101010501010f1013-000000-03d4e2a58903a405-6db8f439097a-8ad3/relatives"
        },
        "relations:relations": {
            "href": "https://CloudUX_Hostname/apis/avid.pam;version=2;realm=REALM/assets/060a2b340101010501010f1013-000000-03d4e2a58903a405-6db8f439097a-8ad3/relations"
        },
        "relations:relation-types": {
            "href": "https://CloudUX_Hostname/apis/avid.pam;version=2;realm=REALM/assets/060a2b340101010501010f1013-000000-03d4e2a58903a405-6db8f439097a-8ad3/relation-types"
        },
        "aa:thumb": {
            "href": "https://CloudUX_Hostname/apis/avid.pam;version=2;realm=REALM/assets/060a2b340101010501010f1013-000000-03d4e2a58903a405-6db8f439097a-8ad3/thumbs"
        },
        "aa:attributes": {
            "href": "https://CloudUX_Hostname/apis/avid.pam;version=2;realm=REALM/assets/060a2b340101010501010f1013-000000-03d4e2a58903a405-6db8f439097a-8ad3/attributes"
        },
        "pa:asset-associations": {
            "href": "https://CloudUX_Hostname/apis/avid.pam;version=2;realm=REALM/assets/060a2b340101010501010f1013-000000-03d4e2a58903a405-6db8f439097a-8ad3/associations"
        },
        "aa:time-based": {
            "href": "https://CloudUX_Hostname/apis/avid.pam;version=2;realm=REALM/assets/060a2b340101010501010f1013-000000-03d4e2a58903a405-6db8f439097a-8ad3/time-based"
        },
        "aa:update-time-based": {
            "href": "https://CloudUX_Hostname/apis/avid.pam;version=2;realm=REALM/assets/060a2b340101010501010f1013-000000-03d4e2a58903a405-6db8f439097a-8ad3/time-based"
        },
        "aa:delete-time-based": {
            "href": "https://CloudUX_Hostname/apis/avid.pam;version=2;realm=REALM/assets/060a2b340101010501010f1013-000000-03d4e2a58903a405-6db8f439097a-8ad3/time-based"
        },
        "pa:asset-medias": {
            "href": "https://CloudUX_Hostname/apis/avid.pam;version=2;realm=REALM/assets/060a2b340101010501010f1013-000000-03d4e2a58903a405-6db8f439097a-8ad3/filemobs"
        },
        "aa:update-asset": {
            "href": "https://CloudUX_Hostname/apis/avid.pam;version=2;realm=REALM/assets/060a2b340101010501010f1013-000000-03d4e2a58903a405-6db8f439097a-8ad3",
            "type": "application/hal+json"
        },
        "aa:update-attributes": {
            "href": "https://CloudUX_Hostname/apis/avid.pam;version=2;realm=REALM/assets/060a2b340101010501010f1013-000000-03d4e2a58903a405-6db8f439097a-8ad3/attributes",
            "type": "application/hal+json"
        },
        "aa:access-by-type-usage-by-protocol": {
            "href": "https://CloudUX_Hostname/apis/avid.pam;version=2;realm=REALM/assets/060a2b340101010501010f1013-000000-03d4e2a58903a405-6db8f439097a-8ad3/access-files{?filetype,usage,protocol}",
            "templated": true
        },
        "loc:referencing-items": {
            "href": "https://CloudUX_Hostname/apis/avid.pam;version=2;realm=REALM/assets/060a2b340101010501010f1013-000000-03d4e2a58903a405-6db8f439097a-8ad3/ref"
        },
        "datamodel:asset-model": {
            "href": "https://CloudUX_Hostname/apis/avid.pam;version=2;realm=REALM/asset-model/060a2b340101010501010f1013-000000-03d4e2a58903a405-6db8f439097a-8ad3"
        },
        "aa:export-asset-command": {
            "href": "https://CloudUX_Hostname/apis/avid.pam;version=2;realm=REALM/assets/060a2b340101010501010f1013-000000-03d4e2a58903a405-6db8f439097a-8ad3/command/export-asset"
        },
        "pa:mediainfo": {
            "href": "https://CloudUX_Hostname/apis/avid.pam;version=2;realm=REALM/mediainfo/060a2b340101010501010f1013-000000-03d4e2a58903a405-6db8f439097a-8ad3"
        },
        "aa:file-package": {
            "href": "https://CloudUX_Hostname/apis/avid.pam;version=2;realm=REALM/assets/060a2b340101010501010f1013-000000-03d4e2a58903a405-6db8f439097a-8ad3/fileinfo/package/"
        },
        "aa:set-thumb-command": {
            "href": "https://CloudUX_Hostname/apis/avid.pam;version=2;realm=REALM/assets/060a2b340101010501010f1013-000000-03d4e2a58903a405-6db8f439097a-8ad3/command/set-thumb"
        },
        "curies": [
            {
                "name": "aa",
                "href": "http://developer.avid.com/ctms/api/aa/linkrels/{rel}.html",
                "templated": true
            },
            {
                "name": "pa",
                "href": "http://developer.avid.com/ctms/api/pa/linkrels/{rel}.html",
                "templated": true
            },
            {
                "name": "datamodel",
                "href": "http://developer.avid.com/ctms/api/datamodel/linkrels/{rel}.html",
                "templated": true
            }
        ]
    }
}
See more information about aa:assets resource: Resource aa:assets
See more information about aa:asset-by-id link relation: Link relation aa:asset-by-id
Time-based
CloudUX has aa:time-based resource to represent the time-based annotation of an asset. To update layer or delete parts of the time-based annotation you can use link relations of aa:time-based resource.
Step 1
To get the time-based annotation of an asset you need to use response from the step above: Asset by id
- Once you get response for the link with relation
aa:asset-by-idyou can get time-based information. - Find link with relation
aa:time-based. - Click on the link and make GET request to get time-based annotation.
- Use the token obtained earlier in: Authentication step. The access token should be added to the header of the request as Authorization parameter “Bearer access token“. Pay attention to token expiration time.
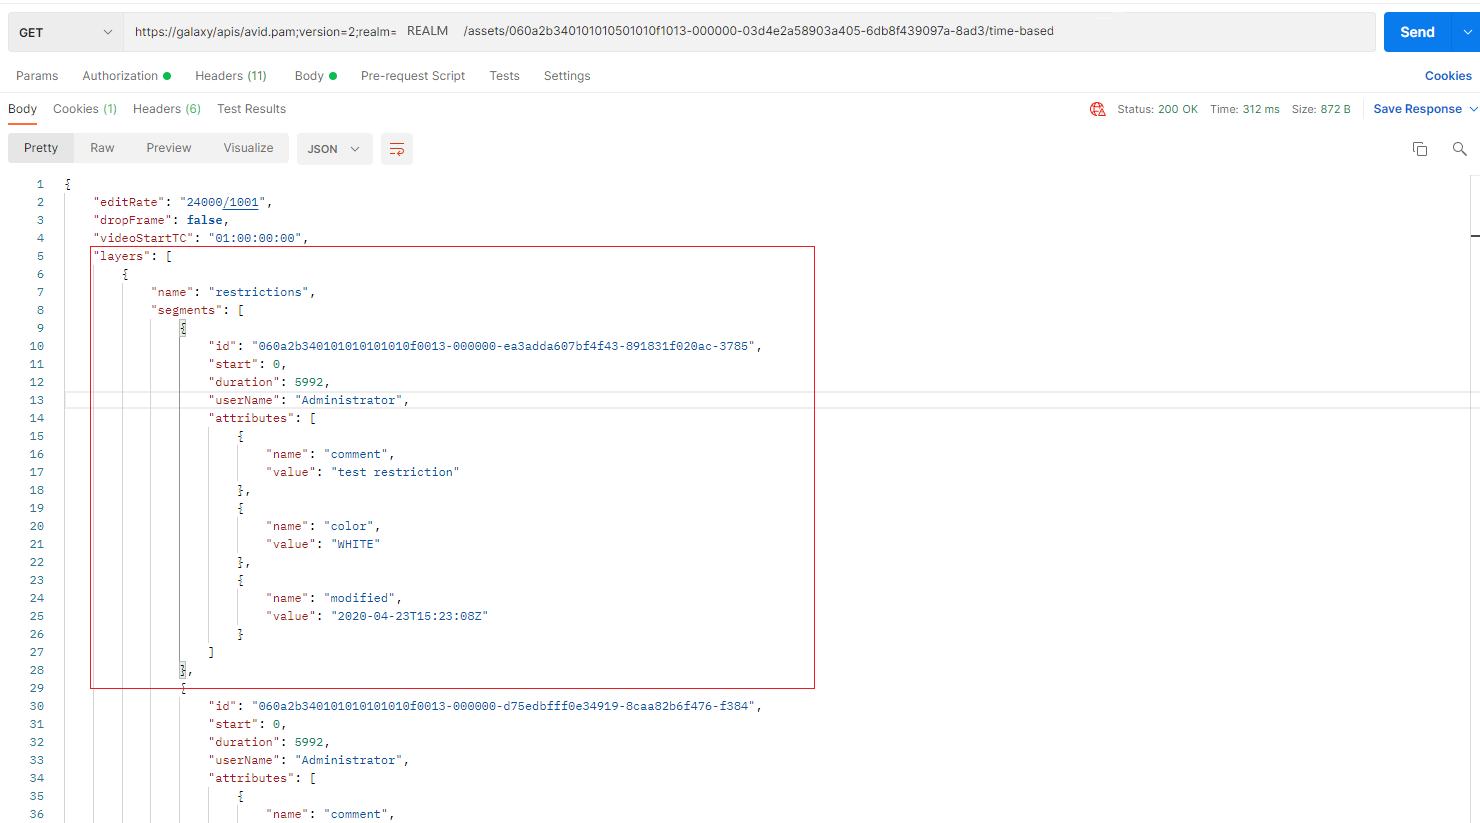
- An example response is showing below:
Response for Production Management: get time-based annotation of an asset
{
    "editRate": "24000/1001",
    "dropFrame": false,
    "videoStartTC": "01:00:00:00",

    "layers": [
        {
            "name": "restrictions",
            "segments": [
                {
                    "id": "060a2b340101010101010f0013-000000-ea3adda607bf4f43-891831f020ac-3785",
                    "start": 0,
                    "duration": 5992,
                    "userName": "Administrator",
                    "attributes": [
                        {
                            "name": "comment",
                            "value": "test restriction"
                        },
                        {
                            "name": "color",
                            "value": "WHITE"
                        },
                        {
                            "name": "modified",
                            "value": "2020-04-23T15:23:08Z"
                        }
                    ]
                },
                {
                    "id": "060a2b340101010101010f0013-000000-d75edbfff0e34919-8caa82b6f476-f384",
                    "start": 0,
                    "duration": 5992,
                    "userName": "Administrator",
                    "attributes": [
                        {
                            "name": "comment",
                            "value": "test restriction"
                        },
                        {
                            "name": "color",
                            "value": "WHITE"
                        },
                        {
                            "name": "modified",
                            "value": "2020-05-06T11:00:11Z"
                        }
                    ]
                }
            ]
        },
        {
            "name": "V1",
            "segments": [
                {
                    "id": "060a2b340101010101010f0013-000000-e57dc4e997da49f8-985ebf96c8f7-a779",
                    "start": 0,
                    "duration": 1,
                    "userName": "Administrator",
                    "attributes": [
                        {
                            "name": "color",
                            "value": "Green"
                        },
                        {
                            "name": "comment",
                            "value": ""
                        }
                    ]
                },
                {
                    "id": "060a2b340101010101010f0013-000000-ae9068f50b424460-82892befd9ba-7c21",
                    "start": 0,
                    "duration": 1,
                    "userName": "Administrator",
                    "attributes": [
                        {
                            "name": "color",
                            "value": "Red"
                        },
                        {
                            "name": "comment",
                            "value": ""
                        }
                    ]
                },
                {
                    "id": "060a2b340101010101010f0013-000000-73373b57e4e34c91-bdd2718eec22-e3d7",
                    "start": 0,
                    "duration": 1,
                    "userName": "Administrator",
                    "attributes": [
                        {
                            "name": "color",
                            "value": "Red"
                        },
                        {
                            "name": "comment",
                            "value": "test"
                        }
                    ]
                }
            ]
        }
    ],

    "_links": {
        "self": {
            "href": "https://CloudUX_Hostname/apis/avid.pam;version=2;realm=REALM/assets/060a2b340101010501010f1013-000000-03d4e2a58903a405-6db8f439097a-8ad3/time-based"
        },
        "aa:assets": {
            "href": "https://CloudUX_Hostname/apis/avid.pam;version=2;realm=REALM/assets"
        },
        "aa:asset": {
            "href": "https://CloudUX_Hostname/apis/avid.pam;version=2;realm=REALM/assets/060a2b340101010501010f1013-000000-03d4e2a58903a405-6db8f439097a-8ad3"
        },
        "aa:delete-time-based": {
            "href": "https://CloudUX_Hostname/apis/avid.pam;version=2;realm=REALM/assets/060a2b340101010501010f1013-000000-03d4e2a58903a405-6db8f439097a-8ad3/time-based"
        },
        "aa:update-time-based": {
            "href": "https://CloudUX_Hostname/apis/avid.pam;version=2;realm=REALM/assets/060a2b340101010501010f1013-000000-03d4e2a58903a405-6db8f439097a-8ad3/time-based"
        },
        "curies": [
            {
                "name": "aa",
                "href": "http://developer.avid.com/ctms/api/aa/linkrels/{rel}.html",
                "templated": true
            }
        ]
    }
}
See more information about aa:time-based resource: Resource aa:time-based
Step 2
To update existing segment of time-based annotation you need to use aa:update-time-based link relation of the aa:time-based resource. From response above: get time-based, you need a link under _links.aa:update-time-based.
- Once you found the link make PATCH request to update time-based.
- In the request body put a JSON object with the fields:
- name - Name of the layer.
- segments - An array with one item for each segment in this layer.
- id - Identifier of the segment. The value is unique within a layer for an asset.
- start - Start of the segment.
- duration - The duration of the segment.
- attributes - An array of attribute items for the segment.
- name - The name of the attribute.
- value - The value of the attribute.
- type - Type of the attribute. If not present, the attribute is a string attribute.
- userName - The name of the user in MediaCentral Production Management for markers.
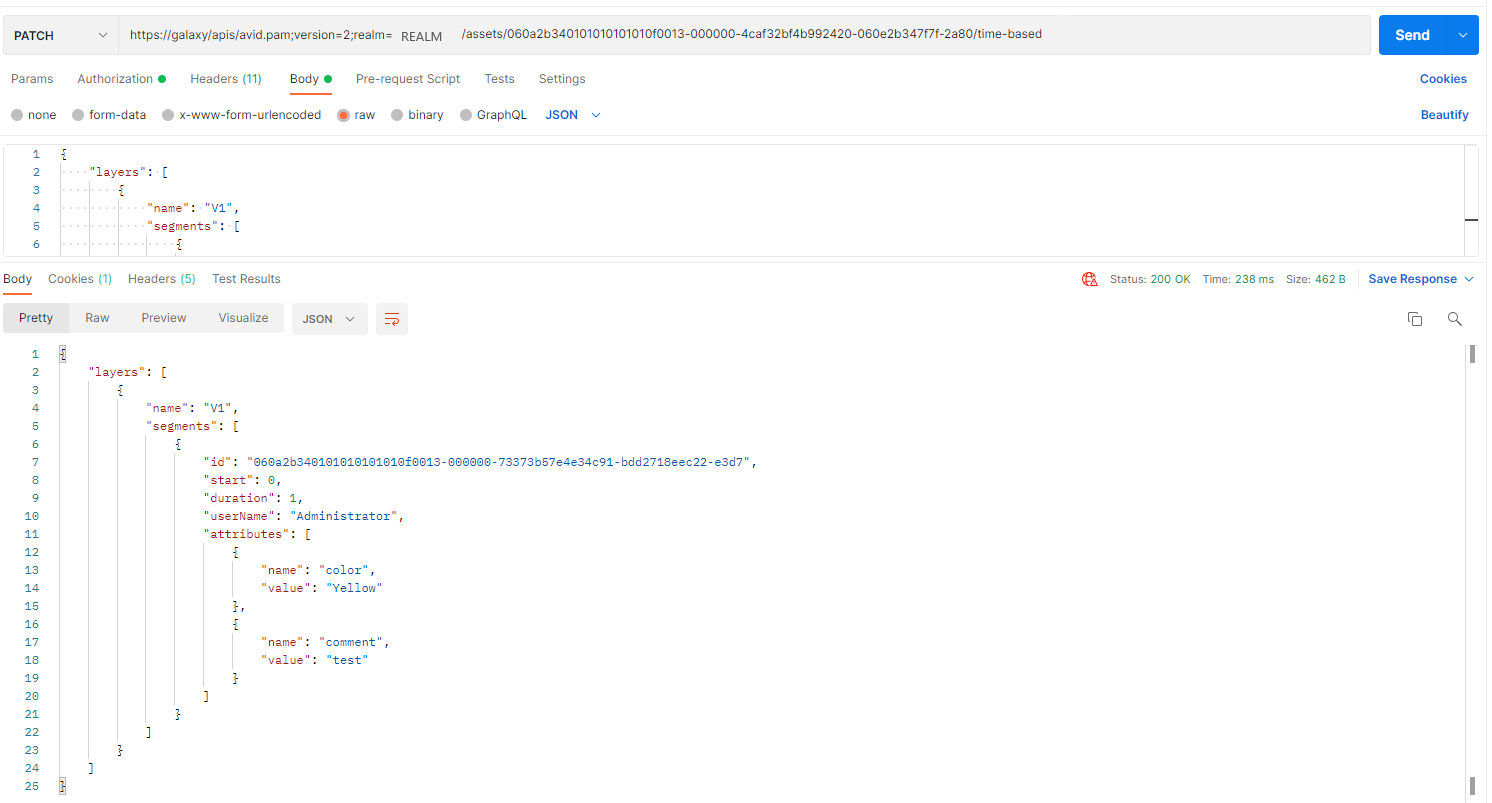
- An exammple of request body:
{ "layers": [ { "name": "V1", "segments": [ { "id": "060a2b340101010101010f0013-000000-73373b57e4e34c91-bdd2718eec22-e3d7", "start": 0, "duration": 1, "userName": "Administrator", "attributes": [ { "name": "color", "value": "Yellow" }, { "name": "comment", "value": "test" } ] } ] } ] } - Use the token obtained earlier in: Authentication step. The access token should be added to the header of the request as Authorization parameter “Bearer access token“. Pay attention to token expiration time.
- An example response is showing below:
Response for Production management: update time based
{
    "layers": [
        {
            "name": "V1",
            "segments": [
                {
                    "id": "060a2b340101010101010f0013-000000-73373b57e4e34c91-bdd2718eec22-e3d7",
                    "start": 0,
                    "duration": 1,
                    "userName": "Administrator",
                    "attributes": [
                        {
                            "name": "color",
                            "value": "Yellow"
                        },
                        {
                            "name": "comment",
                            "value": "test"
                        }
                    ]
                }
            ]
        }
    ]
}
See more information about aa:update-time-based resource: Link relation aa:update-time-based
Step 3
To delete parts of the time-based annotation you need to use response from the step above: get time-based, you need a link under _links.aa:delete-time-based.
- Once you found the link add some query parameters to delete specific segments from the layer. Without query parameters, all segments in all layers are deleted. See Query parameters for aa:time-based for details.
- Example link for deletion:
https://CloudUX_Hostname/apis/avid.pam;version=2;realm=REALM/assets/ASSET_ID/time-based?layers=V1,segmentids=SEGMENT_ID,start=0,end=1,username=Administrator - When you've specified the query parameters make DELETE request to delete time-based.
- Use the token obtained earlier in: Authentication step. The access token should be added to the header of the request as Authorization parameter “Bearer access token“. Pay attention to token expiration time.

See more information about aa:delete-time-based link relation: Link relation aa:delete-time-based
Move item
To move a single location item to the folder item you can do the following request.
To move location item or folder to another folder you need to use response from the step above: List items in folder
- Once you get response for the link with relation
loc:item-by-idyou can move item into this folder. In this example we will move item into /Projects folder. - Find link with relation
loc:move-item. - Click on the link and make POST request to move item.
- In the request body put a JSON object with the fields:
- systemID
- systemType
- id - id of the item to move
- type - type of the movable item
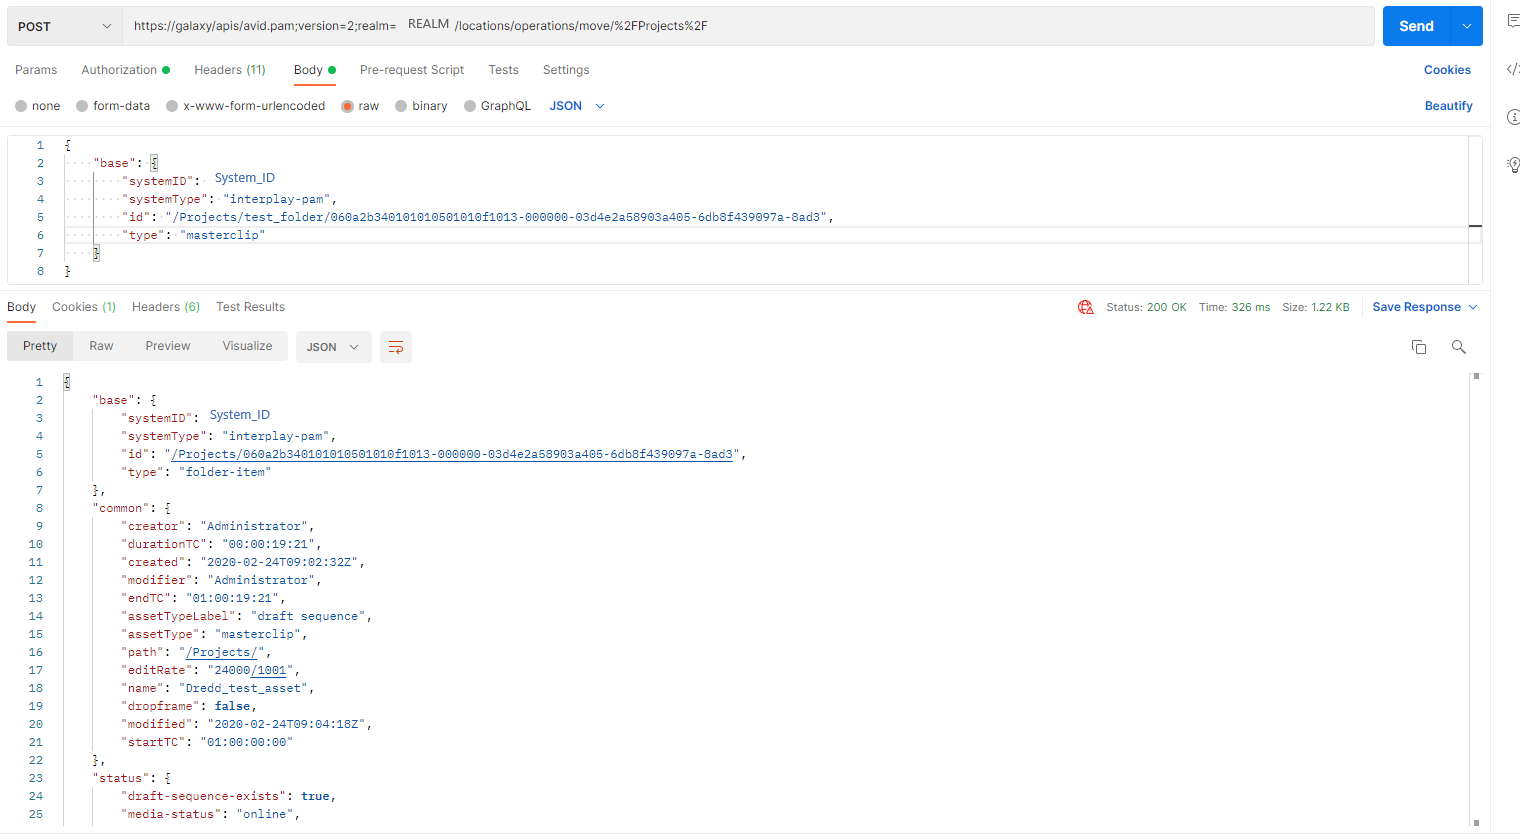
- An exammple of request body:
{ "base": { "systemID": "SYSTEM_ID", "systemType": "interplay-pam", "id": "/Projects/test_folder/060a2b340101010501010f1013-000000-03d4e2a58903a405-6db8f439097a-8ad3", "type": "masterclip" } } - Use the token obtained earlier in: Authentication step. The access token should be added to the header of the request as Authorization parameter “Bearer access token“. Pay attention to token expiration time.
- An example response is showing below:
Response for Production Management: move item
{
    "base": {
        "systemID": "79912D55-7AA3-4D97-8B0E-ABC517D1E747",
        "systemType": "interplay-pam",
        "id": "/Projects/060a2b340101010501010f1013-000000-03d4e2a58903a405-6db8f439097a-8ad3",
        "type": "folder-item"
    },
    "common": {
        "creator": "Administrator",
        "durationTC": "00:00:19:21",
        "created": "2020-02-24T09:02:32Z",
        "modifier": "Administrator",
        "endTC": "01:00:19:21",
        "assetTypeLabel": "draft sequence",
        "assetType": "masterclip",
        "path": "/Projects/",
        "editRate": "24000/1001",
        "name": "Dredd_test_asset",
        "dropframe": false,
        "modified": "2020-02-24T09:04:18Z",
        "startTC": "01:00:00:00"
    },
    "status": {
        "draft-sequence-exists": true,
        "media-status": "online",
        "ama-status": "no-ama"
    },
    "_links": {
        "self": {
            "href": "https://CloudUX_Hostname/apis/avid.pam;version=2;realm=REALM/locations/items/%2FProjects%2F060a2b340101010501010f1013-000000-03d4e2a58903a405-6db8f439097a-8ad3"
        },
        "loc:referenced-object": {
            "href": "https://CloudUX_Hostname/apis/avid.pam;version=2;realm=REALM/assets/060a2b340101010501010f1013-000000-03d4e2a58903a405-6db8f439097a-8ad3"
        },
        "loc:path-to-root": {
            "href": "https://CloudUX_Hostname/apis/avid.pam;version=2;realm=REALM/locations/path/folder/%2FProjects%2F060a2b340101010501010f1013-000000-03d4e2a58903a405-6db8f439097a-8ad3"
        },
        "loc:update-item": {
            "href": "https://CloudUX_Hostname/apis/avid.pam;version=2;realm=REALM/locations/items/%2FProjects%2F060a2b340101010501010f1013-000000-03d4e2a58903a405-6db8f439097a-8ad3"
        },
        "loc:delete-item": {
            "href": "https://CloudUX_Hostname/apis/avid.pam;version=2;realm=REALM/locations/operations/delete/%2FProjects%2F060a2b340101010501010f1013-000000-03d4e2a58903a405-6db8f439097a-8ad3"
        },
        "loc:export-item-command": {
            "href": "https://CloudUX_Hostname/apis/avid.pam;version=2;realm=REALM/locations/items/%2FProjects%2F060a2b340101010501010f1013-000000-03d4e2a58903a405-6db8f439097a-8ad3/command/export-item"
        },
        "loc:parent-folder": {
            "href": "https://CloudUX_Hostname/apis/avid.pam;version=2;realm=REALM/locations/items/parent/%2FProjects%2F060a2b340101010501010f1013-000000-03d4e2a58903a405-6db8f439097a-8ad3"
        },
        "loc:parent-collection": {
            "href": "https://CloudUX_Hostname/apis/avid.pam;version=2;realm=REALM/locations/items/parent/collection/%2FProjects%2F060a2b340101010501010f1013-000000-03d4e2a58903a405-6db8f439097a-8ad3"
        },
        "loc:locations": {
            "href": "https://CloudUX_Hostname/apis/avid.pam;version=2;realm=REALM/locations"
        },
        "curies": [
            {
                "name": "loc",
                "href": "http://developer.avid.com/ctms/api/loc/linkrels/{rel}.html",
                "templated": true
            },
            {
                "name": "aa",
                "href": "http://developer.avid.com/ctms/api/aa/linkrels/{rel}.html",
                "templated": true
            },
            {
                "name": "pa",
                "href": "http://developer.avid.com/ctms/api/pa/linkrels/{rel}.html",
                "templated": true
            }
        ]
    },
    "_embedded": {
        "loc:referenced-object": {
            "base": {
                "systemID": "79912D55-7AA3-4D97-8B0E-ABC517D1E747",
                "systemType": "interplay-pam",
                "id": "060a2b340101010501010f1013-000000-03d4e2a58903a405-6db8f439097a-8ad3",
                "type": "masterclip"
            },
            "common": {
                "creator": "Administrator",
                "durationTC": "00:00:19:21",
                "created": "2020-02-24T09:02:32Z",
                "editRate": "24000/1001",
                "modifier": "Administrator",
                "endTC": "01:00:19:21",
                "name": "Dredd_test_asset",
                "dropframe": false,
                "modified": "2020-02-24T09:04:18Z",
                "startTC": "01:00:00:00",
                "assetTypeLabel": "draft sequence",
                "assetType": "masterclip"
            },
            "status": {
                "draft-sequence-exists": true,
                "media-status": "online",
                "ama-status": "no-ama"
            },
            "_links": {
                "self": {
                    "href": "https://CloudUX_Hostname/apis/avid.pam;version=2;realm=REALM/assets/060a2b340101010501010f1013-000000-03d4e2a58903a405-6db8f439097a-8ad3"
                },
                "aa:asset": {
                    "href": "https://CloudUX_Hostname/apis/avid.pam;version=2;realm=REALM/assets/060a2b340101010501010f1013-000000-03d4e2a58903a405-6db8f439097a-8ad3"
                },
                "aa:assets": {
                    "href": "https://CloudUX_Hostname/apis/avid.pam;version=2;realm=REALM/assets"
                },
                "pa:asset-relatives": {
                    "href": "https://CloudUX_Hostname/apis/avid.pam;version=2;realm=REALM/assets/060a2b340101010501010f1013-000000-03d4e2a58903a405-6db8f439097a-8ad3/relatives"
                },
                "relations:relations": {
                    "href": "https://CloudUX_Hostname/apis/avid.pam;version=2;realm=REALM/assets/060a2b340101010501010f1013-000000-03d4e2a58903a405-6db8f439097a-8ad3/relations"
                },
                "relations:relation-types": {
                    "href": "https://CloudUX_Hostname/apis/avid.pam;version=2;realm=REALM/assets/060a2b340101010501010f1013-000000-03d4e2a58903a405-6db8f439097a-8ad3/relation-types"
                },
                "aa:thumb": {
                    "href": "https://CloudUX_Hostname/apis/avid.pam;version=2;realm=REALM/assets/060a2b340101010501010f1013-000000-03d4e2a58903a405-6db8f439097a-8ad3/thumbs"
                },
                "aa:attributes": {
                    "href": "https://CloudUX_Hostname/apis/avid.pam;version=2;realm=REALM/assets/060a2b340101010501010f1013-000000-03d4e2a58903a405-6db8f439097a-8ad3/attributes"
                },
                "pa:asset-associations": {
                    "href": "https://CloudUX_Hostname/apis/avid.pam;version=2;realm=REALM/assets/060a2b340101010501010f1013-000000-03d4e2a58903a405-6db8f439097a-8ad3/associations"
                },
                "aa:time-based": {
                    "href": "https://CloudUX_Hostname/apis/avid.pam;version=2;realm=REALM/assets/060a2b340101010501010f1013-000000-03d4e2a58903a405-6db8f439097a-8ad3/time-based"
                },
                "aa:update-time-based": {
                    "href": "https://CloudUX_Hostname/apis/avid.pam;version=2;realm=REALM/assets/060a2b340101010501010f1013-000000-03d4e2a58903a405-6db8f439097a-8ad3/time-based"
                },
                "aa:delete-time-based": {
                    "href": "https://CloudUX_Hostname/apis/avid.pam;version=2;realm=REALM/assets/060a2b340101010501010f1013-000000-03d4e2a58903a405-6db8f439097a-8ad3/time-based"
                },
                "pa:asset-medias": {
                    "href": "https://CloudUX_Hostname/apis/avid.pam;version=2;realm=REALM/assets/060a2b340101010501010f1013-000000-03d4e2a58903a405-6db8f439097a-8ad3/filemobs"
                },
                "aa:update-asset": {
                    "href": "https://CloudUX_Hostname/apis/avid.pam;version=2;realm=REALM/assets/060a2b340101010501010f1013-000000-03d4e2a58903a405-6db8f439097a-8ad3",
                    "type": "application/hal+json"
                },
                "aa:update-attributes": {
                    "href": "https://CloudUX_Hostname/apis/avid.pam;version=2;realm=REALM/assets/060a2b340101010501010f1013-000000-03d4e2a58903a405-6db8f439097a-8ad3/attributes",
                    "type": "application/hal+json"
                },
                "aa:access-by-type-usage-by-protocol": {
                    "href": "https://CloudUX_Hostname/apis/avid.pam;version=2;realm=REALM/assets/060a2b340101010501010f1013-000000-03d4e2a58903a405-6db8f439097a-8ad3/access-files{?filetype,usage,protocol}",
                    "templated": true
                },
                "loc:referencing-items": {
                    "href": "https://CloudUX_Hostname/apis/avid.pam;version=2;realm=REALM/assets/060a2b340101010501010f1013-000000-03d4e2a58903a405-6db8f439097a-8ad3/ref"
                },
                "datamodel:asset-model": {
                    "href": "https://CloudUX_Hostname/apis/avid.pam;version=2;realm=REALM/asset-model/060a2b340101010501010f1013-000000-03d4e2a58903a405-6db8f439097a-8ad3"
                },
                "aa:export-asset-command": {
                    "href": "https://CloudUX_Hostname/apis/avid.pam;version=2;realm=REALM/assets/060a2b340101010501010f1013-000000-03d4e2a58903a405-6db8f439097a-8ad3/command/export-asset"
                },
                "pa:mediainfo": {
                    "href": "https://CloudUX_Hostname/apis/avid.pam;version=2;realm=REALM/mediainfo/060a2b340101010501010f1013-000000-03d4e2a58903a405-6db8f439097a-8ad3"
                },
                "aa:file-package": {
                    "href": "https://CloudUX_Hostname/apis/avid.pam;version=2;realm=REALM/assets/060a2b340101010501010f1013-000000-03d4e2a58903a405-6db8f439097a-8ad3/fileinfo/package/"
                },
                "aa:set-thumb-command": {
                    "href": "https://CloudUX_Hostname/apis/avid.pam;version=2;realm=REALM/assets/060a2b340101010501010f1013-000000-03d4e2a58903a405-6db8f439097a-8ad3/command/set-thumb"
                }
            }
        }
    }
}
See more information about loc:move-item link relation: Link relation loc:move-item
Add a copy of the item
CloudUX allows you to add a copy of an existing item (an asset, a location item, a folder) to the folder collection.
To add item into another folder you need to use response from the step above: List items in folder
- Once you get response for the link with relation
loc:item-by-idyou can add item into this folder. In this example we will add item into /Projects folder. - Find link with relation
loc:add-item. - Click on the link and make POST request to add item.
- In the request body put a JSON object with the fields:
- systemID
- systemType
- id - id of the item to add
- type - type of the item
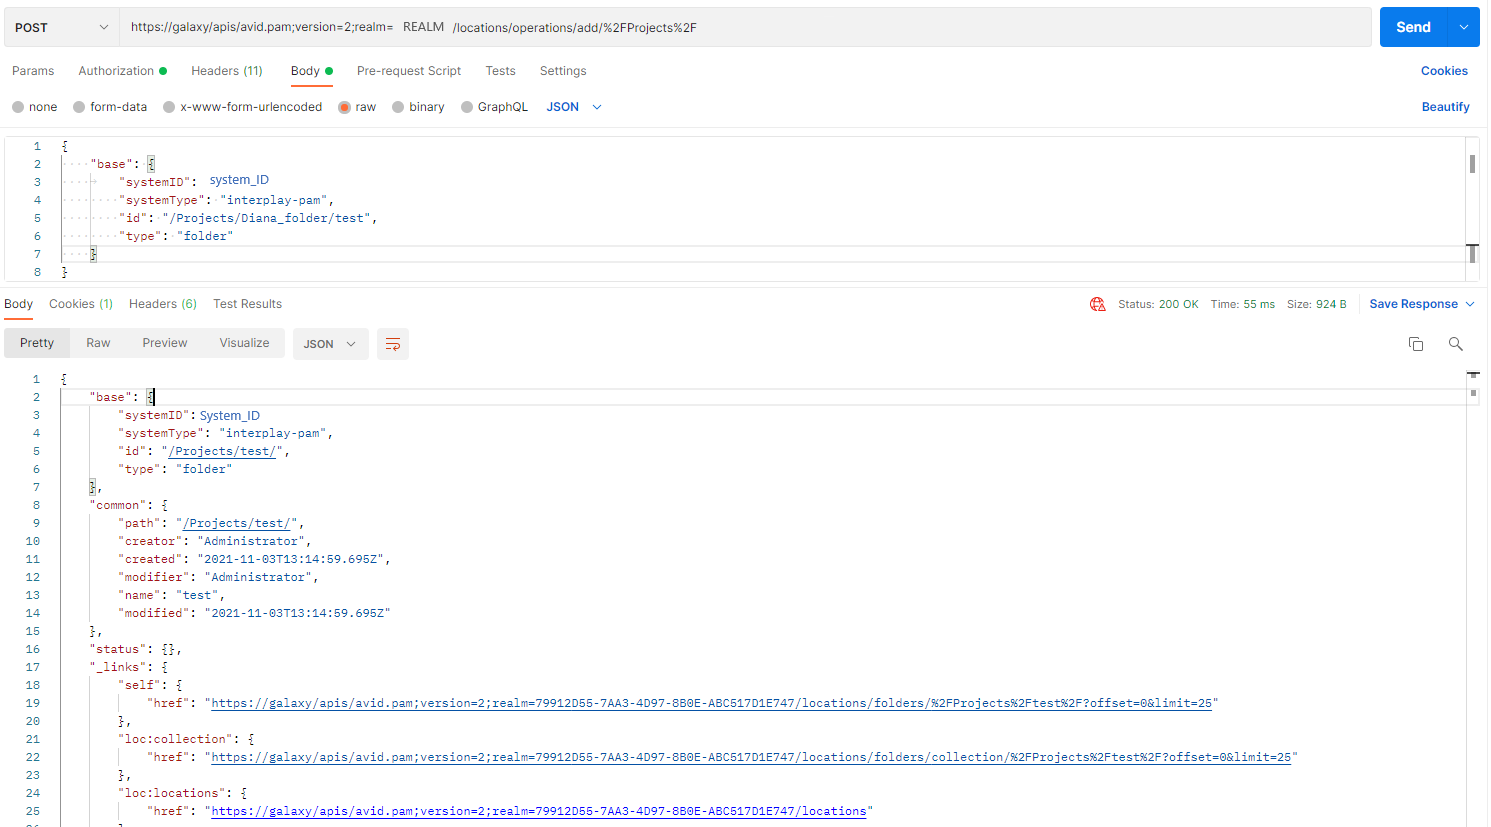
- An exammple of request body:
{ "base": { "systemID": "System_ID", "systemType": "interplay-pam", "id": "/Projects/Diana_folder/test", "type": "folder" } } - Use the token obtained earlier in: Authentication step. The access token should be added to the header of the request as Authorization parameter “Bearer access token“. Pay attention to token expiration time.
- An example response is showing below:
Response for Production Management: add item
{
    "base": {
        "systemID": "System_ID",
        "systemType": "interplay-pam",
        "id": "/Projects/test/",
        "type": "folder"
    },
    "common": {
        "path": "/Projects/test/",
        "creator": "Administrator",
        "created": "2021-11-03T13:14:59.695Z",
        "modifier": "Administrator",
        "name": "test",
        "modified": "2021-11-03T13:14:59.695Z"
    },
    "status": {},
    "_links": {
        "self": {
            "href": "https://CloudUX_Hostname/apis/avid.pam;version=2;realm=REALM/locations/folders/%2FProjects%2Ftest%2F?offset=0&limit=25"
        },
        "loc:collection": {
            "href": "https://CloudUX_Hostname/apis/avid.pam;version=2;realm=REALM/locations/folders/collection/%2FProjects%2Ftest%2F?offset=0&limit=25"
        },
        "loc:locations": {
            "href": "https://CloudUX_Hostname/apis/avid.pam;version=2;realm=REALM/locations"
        },
        "pa:reservations": {
            "href": "https://CloudUX_Hostname/apis/avid.pam;version=2;realm=REALM/locations/folders/reservations/%2FProjects%2Ftest%2F"
        },
        "loc:create-folder": {
            "href": "https://CloudUX_Hostname/apis/avid.pam;version=2;realm=REALM/locations/folders/%2FProjects%2Ftest%2F?offset=0&limit=25"
        },
        "loc:update-item": {
            "href": "https://CloudUX_Hostname/apis/avid.pam;version=2;realm=REALM/locations/items/%2FProjects%2Ftest%2F?offset=0&limit=25"
        },
        "loc:delete-item-in-folder-by-id-bulk-command": {
            "href": "https://CloudUX_Hostname/apis/avid.pam;version=2;realm=REALM/locations/folders/%2FProjects%2Ftest%2F/command/delete-items"
        },
        "loc:add-item": {
            "href": "https://CloudUX_Hostname/apis/avid.pam;version=2;realm=REALM/locations/operations/add/%2FProjects%2Ftest%2F"
        },
        "loc:move-item": {
            "href": "https://CloudUX_Hostname/apis/avid.pam;version=2;realm=REALM/locations/operations/move/%2FProjects%2Ftest%2F"
        },
        "loc:add-items": {
            "href": "https://CloudUX_Hostname/apis/avid.pam;version=2;realm=REALM/locations/operations/add-items/%2FProjects%2Ftest%2F"
        },
        "loc:move-items": {
            "href": "https://CloudUX_Hostname/apis/avid.pam;version=2;realm=REALM/locations/operations/move-items/%2FProjects%2Ftest%2F"
        },
        "pa:upload-file": {
            "href": "https://CloudUX_Hostname/asset/pam/file/upload"
        },
        "pa:import-asset-command": {
            "href": "https://CloudUX_Hostname/apis/avid.pam;version=2;realm=REALM/locations/folders/%2FProjects%2Ftest%2F/command/import-asset"
        },
        "loc:path-to-root": {
            "href": "https://CloudUX_Hostname/apis/avid.pam;version=2;realm=REALM/locations/path/folder/%2FProjects%2Ftest%2F"
        },
        "loc:parent-folder": {
            "href": "https://CloudUX_Hostname/apis/avid.pam;version=2;realm=REALM/locations/folders/parent/%2FProjects%2Ftest%2F"
        },
        "loc:parent-collection": {
            "href": "https://CloudUX_Hostname/apis/avid.pam;version=2;realm=REALM/locations/folders/parent/collection/%2FProjects%2Ftest%2F"
        },
        "loc:collection-at-itemid": {
            "href": "https://CloudUX_Hostname/apis/avid.pam;version=2;realm=REALM/locations/folders/collection/%2FProjects%2Ftest%2F/at/{itemid}",
            "templated": true
        },
        "curies": [
            {
                "name": "loc",
                "href": "http://developer.avid.com/ctms/api/loc/linkrels/{rel}.html",
                "templated": true
            },
            {
                "name": "aa",
                "href": "http://developer.avid.com/ctms/api/aa/linkrels/{rel}.html",
                "templated": true
            },
            {
                "name": "pa",
                "href": "http://developer.avid.com/ctms/api/pa/linkrels/{rel}.html",
                "templated": true
            }
        ]
    },
    "_embedded": {
        "loc:collection": {
            "paging": {
                "limit": 25,
                "offset": 0,
                "elements": 0,
                "totalElements": 3
            },
            "_links": {
                "self": {
                    "href": "https://CloudUX_Hostname/apis/avid.pam;version=2;realm=REALM/locations/folders/collection/%2FProjects%2Ftest%2F?offset=0&limit=25"
                },
                "first": {
                    "href": "https://CloudUX_Hostname/apis/avid.pam;version=2;realm=REALM/locations/folders/collection/%2FProjects%2Ftest%2F?offset=0&limit=25"
                },
                "loc:locations": {
                    "href": "https://CloudUX_Hostname/apis/avid.pam;version=2;realm=REALM/locations"
                },
                "curies": [
                    {
                        "name": "loc",
                        "href": "http://developer.avid.com/ctms/api/loc/linkrels/{rel}.html",
                        "templated": true
                    },
                    {
                        "name": "aa",
                        "href": "http://developer.avid.com/ctms/api/aa/linkrels/{rel}.html",
                        "templated": true
                    },
                    {
                        "name": "pa",
                        "href": "http://developer.avid.com/ctms/api/pa/linkrels/{rel}.html",
                        "templated": true
                    }
                ]
            }
        }
    }
}
See more information about loc:add-item link relation: Link relation loc:add-item